AI Can't Rig Live2D,
Yet the Result Came Out Surprisingly Well
Live2D rigging can only be tuned with a mouse inside the editor, so an AI agent can't get a hand in. This time I worked with Opus 5.5 and used only low-level 2D animation fundamentals to turn one illustration into a 2D puppet that turns its head, blinks, talks, and follows the camera. Each of the nine steps comes with a method, an acceptance criterion and a reason, and the FAQ is organized by category of pitfall.
One illustration, nine steps
If you'd rather play first, jump straight to“Try it”at the end of the post: you can turn on your camera and have Kano follow your movements.

This is Kano (花野 in Chinese, カノ in Japanese, 카노 in Korean), an axolotl girl. Her name comes from Lake Xochimilco, the home of the axolotl, which means “flower field” in Nahuatl. She is a 2D puppet: one illustration split into 83 layers that turns its head, blinks, talks, performs 26 motions, and can follow you through the camera.
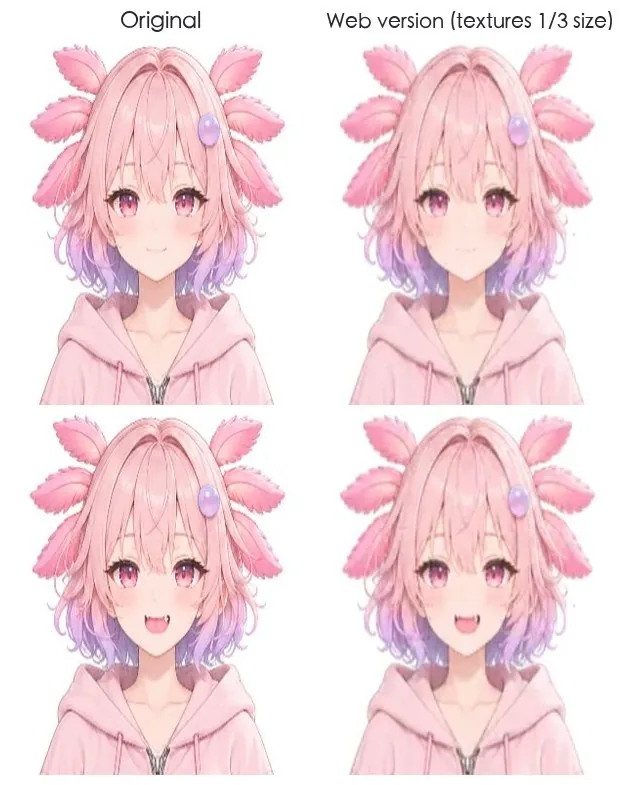
I never opened the Live2D editor for this project. Live2D meshes and deformation can only be tuned with a mouse inside the editor, and the official tooling gives programs no interface to edit meshes, so an AI agent can't get a hand in. Instead I recreated the puppet effect using only low-level 2D animation fundamentals, and the result came out better than I expected. The split of work: I looked at the images and made the calls, and Opus 5.5 wrote the code and measured the numbers. I started on 2026-10-08 and put it on the web on 10-14. The web version deliberately shrinks the textures, so up close it is blurrier than the original (the reason is in Step 9).
Why not use the Live2D editor
Taken apart, everything Live2D does is basic computer graphics: mesh deformation, front-to-back parallax, bones, and image swapping. The editor wraps them in mouse operations, and the interface the official tooling exposes to external programs has no way to edit mesh vertices (checked 2026-10). Cubism Core, which plays the models, can at least be read by a program, which is why Step 1 can measure the official samples. This time I wrote each of these back in code, one by one:
| What is done by hand in the Live2D workflow | What I did this time | Step |
|---|---|---|
| The artist draws the illustration as a layered PSD | Use an image edit to fill in the hidden areas, then split layers with a layer-decomposition model | 2、3 |
| At several head-turn angles, drag the mesh into a side profile with the mouse | Each vertex carries a depth, and code computes the displacement | 1、4 |
| Attach rotation deformers to the arms | Three bones bend; big motions swap the image | 5 |
| Set the mouth, brow and eye shapes at the key values of each parameter | Optical flow pushes the mouth and brows; eyes swap during a blink | 6 |
| Draw motion curves on a timeline | Write the keyframes in code | 7 |
The nine steps at a glance
| Step | Method | Acceptance | Tools |
|---|---|---|---|
| 1 Measure the sample | Measure how far each layer moves when a professional puppet turns its head | A ratio table | Cubism Core |
| 2 Fill in hidden areas | Fill hidden areas with image edits | Scale difference ≤ 3%, rotation ≤ 1.5° | ChatGPT, OpenCV |
| 3 Split layers | The model splits layers; pixels are swapped back to the original | Stacked back, off by 0.035/255 | See-through |
| 4 Head turn | Move vertices only, no image swap | Ratios match the sample | PixiJS |
| 5 Arms | Small angles bend; big motions swap the image | 0 translucent frames at the hand swap | ChatGPT |
| 6 Expressions | Mouth and brows are pushed; eyes swap during a blink | 0 translucent frames | OpenCV optical flow |
| 7 Motions | Lay out keyframes myself, following professional rhythm | All 26 motions move | — |
| 8 Camera | Face and upper body tracked on two separate paths | Live calibration: all 8 items correct | MediaPipe |
| 9 Web release | Public version at lower resolution, outbound requests blocked | Load time 17.5 → 5.4 s | Cloudflare Workers |
The head turn is the first step that surfaces earlier defects: if it exposes an area that was never drawn, go back to Step 2 and fill it in; if a second outline appears, go back to Step 3 and re-split.
Measure the professional sample first, and turn “looks right” into numbers
Before starting, I measured how far each layer of a professional puppet moves when it turns its head.
Method
- Load 12 humanoid sample models with Live2D's official Cubism Core and push the head-turn parameter to its limit
- Take the displacement of the face outline as 1, compute each layer's relative displacement, and take the median across the 12
| Layer | Relative displacement during a head turn (face outline = 1) |
|---|---|
| Back hair | 0.06 |
| Ears | 0.49 |
| Front hair | 1.25 |
| Eyes | 1.44 |
| Nose | 2.06 |
Acceptance
All 12 models agree in direction: the closer a layer is to the camera, the more it moves, and the back hair barely moves (measured 2026-10-09; this represents only the style of the official samples).
Why
By eye I could only tell it looked like a sheet of paper, not which layer to fix. With the ratio table, one measurement of the fourth version showed back hair at 0.40 and ears at 0.90: the front-to-back layering had been flattened.
One main image, with the hidden areas drawn separately
A front-facing illustration contains nothing behind the hair or behind the arms, so those have to be drawn separately.
Method
- Use ChatGPT's image edit with the main image as the base, changing only one thing per image
- Align each edited image back to the main image with ECC (an image registration method), looking only at the unedited areas during alignment
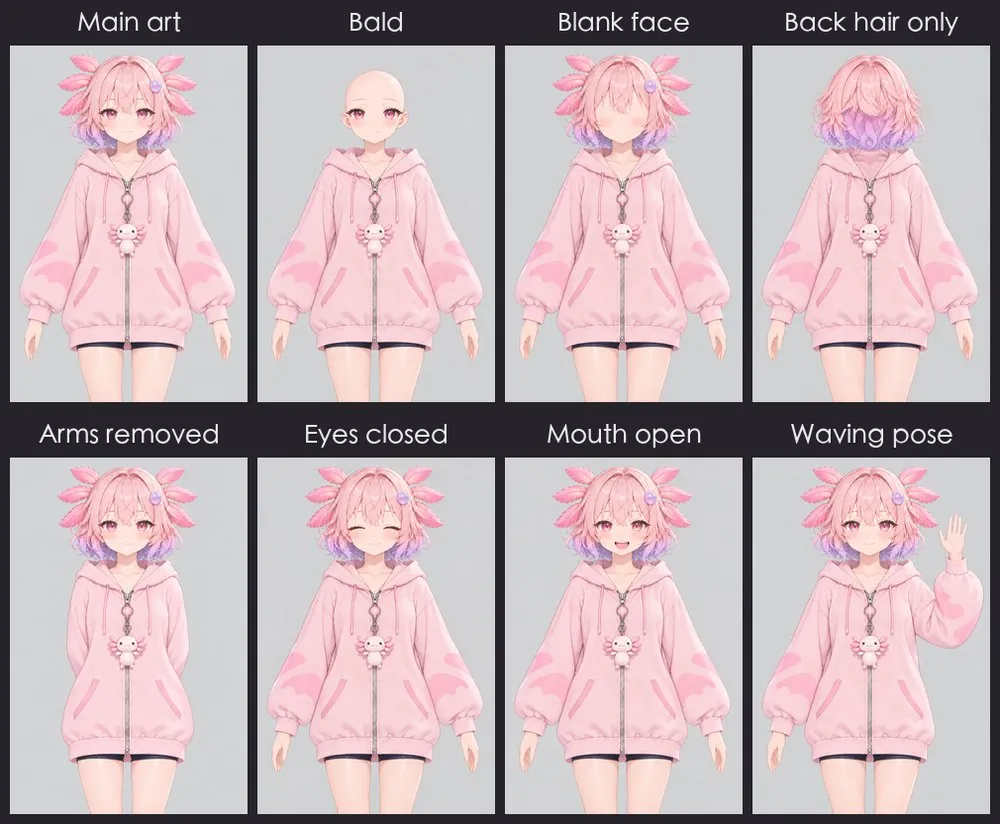
| Image edit | What it fills in |
|---|---|
| Bald head | Head shape, ears, neck |
| Blank face | The skin under the facial features |
| Back hair only | The hair hidden behind the front hair |
| Arms removed | The clothing hidden by the arms |
| Closed eyes, open mouth | Eyelids, mouth interior |
| 6 hand poses such as waving | Arms for big motions (Step 5) |
Acceptance
After alignment, scale difference within 3% and rotation within 1.5°, and a mean color difference below 12/255 in the unedited areas; anything beyond that gets regenerated.
Why
In the second version I tried to infer the side view from the front image using a mathematical surface. It can't produce new information, so the head turned like a sheet of paper.
After splitting layers, swap the visible areas back to original pixels
The layer decomposition is left to the model, but colors come only from the original image.
Method
- Feed the main image and the Step 2 edits into a layer-decomposition model (this time See-through, published in February 2026) and split out layers such as hair, face, facial features and clothing
- In every layer's visible region, paste the pixels back from the original image; each pixel goes only to the topmost layer
- For parts missing from the model's categories (Kano's gills), cut them from the areas of the original image that no layer covers
- Clear noise with opacity below 0.06 from each layer's canvas

Acceptance
With all layers stacked back, the mean difference from the original is 0.035/255, with 0 pixels of holes.
Why
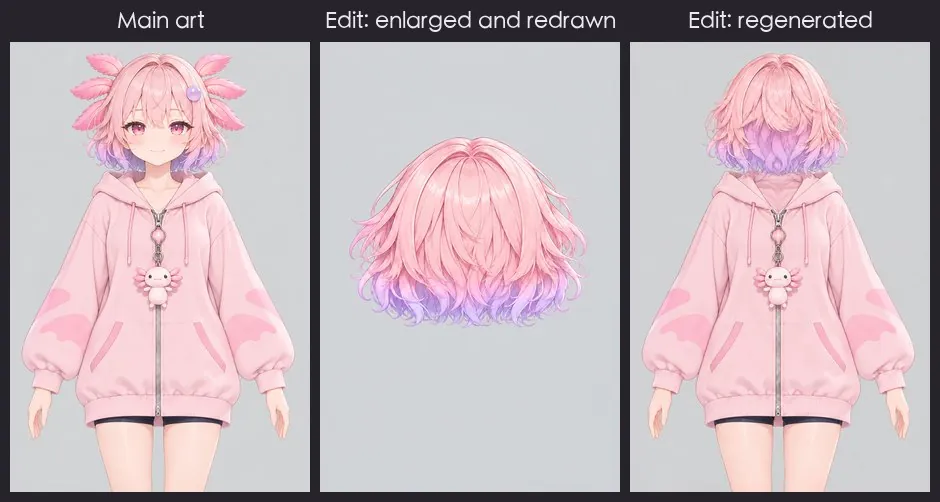
Every layer from the layer-decomposition model is redrawn (second from left above). If the semi-transparent edges of the facial features were also pasted to the skin underneath, a second outline would remain on the face during a head turn.
The head turn only moves vertices, with no image swap
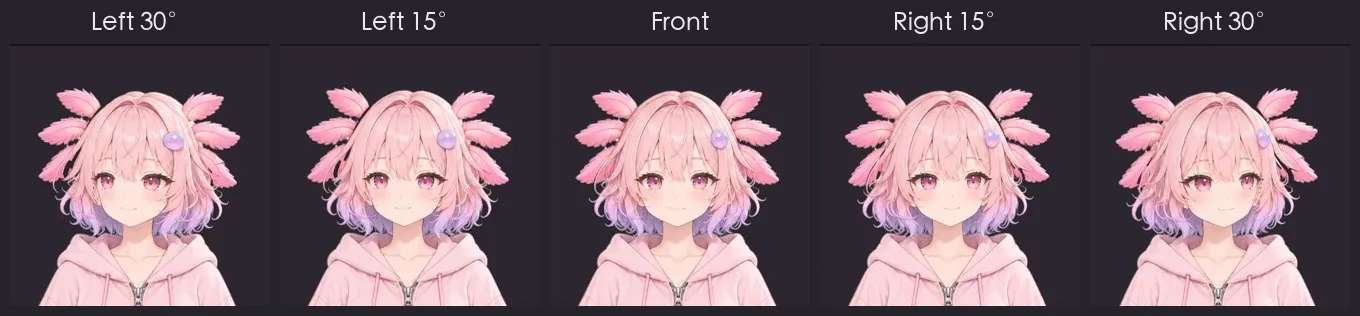
Not a single layer image is swapped; the head is treated as an ellipsoid rotating about an axis, and each layer moves according to the depth in the ratio table.
Method
- Each vertex carries a depth, and the front-to-back distance of each layer is back-derived from the Step 1 ratio table: the nose is frontmost, the back hair rearmost
- The neck barely moves, and the chin slides over it (in the official samples, the neck's displacement is close to 0 during a head turn)
Acceptance
Ratios checked back against the official samples: back hair −0.18, ears 0.53, eyes 1.58, nose 2.00. The head-turn range is capped at 16% of the face width; any larger and the hair splits open at oblique angles.
Why
Cross-fading to another image between angles leaves a double image on the face; if each layer just translates on its own, the head slides along the neck and the neck grows longer the more it turns.
Arms bend at small angles; big motions swap in a different image
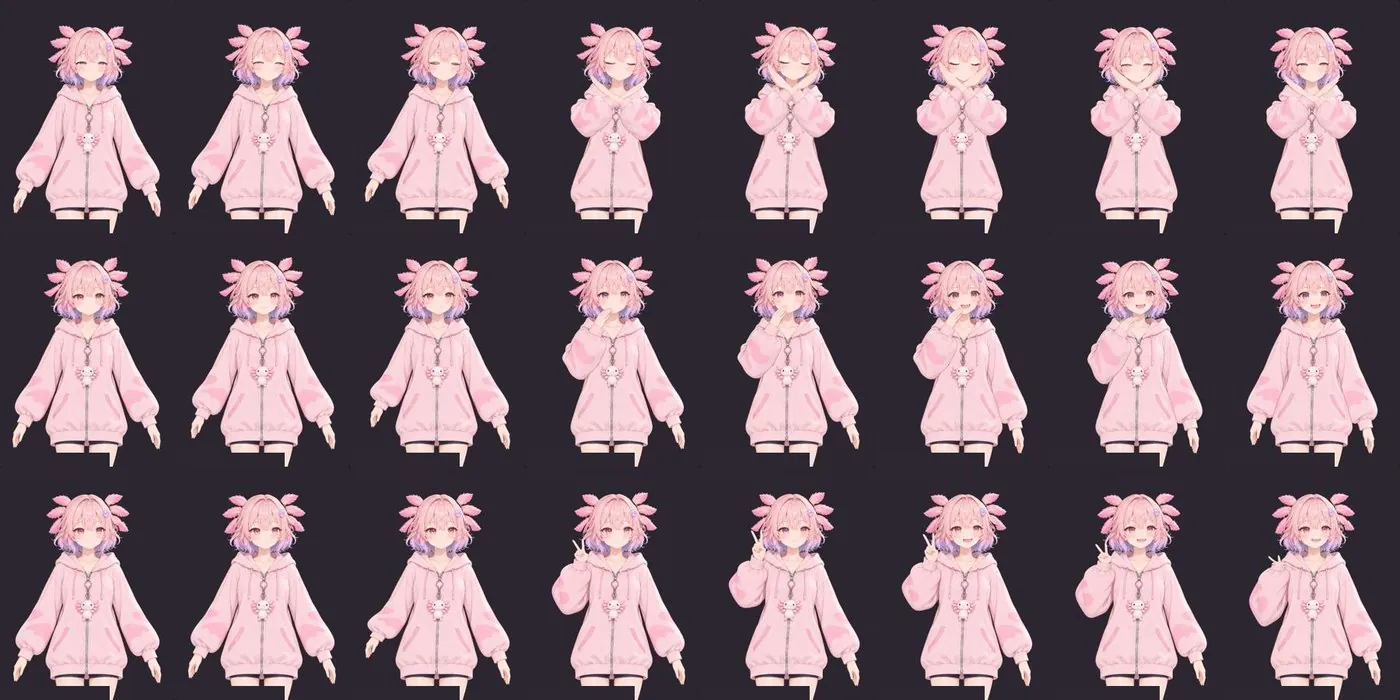
A hanging hand only bends within a few dozen degrees; for big motions like raising a hand, I draw a separate image and swap it in.
Method
- A hanging hand bends with three bones, shoulder, elbow and wrist, and the mesh is made denser near the joints
- For poses like raising a hand, covering the face or hands on hips, I made an image edit for each using the Step 2 method; Kano has 6 sets
- The swap does not cross-fade: the hand first whips toward the pose, switches directly in a single frame midway through the whip, and then the new hand springs into place
- When the hand is raised, the upper arm shrinks to 0.55x and the elbow's pivot moves up with it
Acceptance
Checked frame by frame at 30 frames per second: no translucent hand before or after the frame where the hand is swapped.
Why
An arm drawn from the front that rotates 100° or more on screen is bound to look like cardboard; with a cross-fade, even 0.03 seconds at 30 frames per second will almost surely catch a translucent frame.
Expressions are pushed, and the eyes are swapped on the blink frame
Expression changes don't fade in and out: the mouth and brows are pushed over with optical flow, and the eyes are swapped on the frame where a blink hides it.
Method
- Generate 11 faces that change only the expression, and align them back to the main image with the Step 2 thresholds
- Use optical flow (which computes how each pixel moves between two images) to push the original face into the new expression
- The eyes are not pushed: I force a blink, and on the frame where the eyes are closed, the face and eyes are swapped together. 9 of the 11 expressions take this route

Acceptance
Checked frame by frame at 30 frames per second for these 9 expressions: 0 translucent frames, the face and eyes swap on the same frame, and the eyes are at least 99% closed on the swap frame.
Why
A cross-fade shows two faces stacked on top of each other. Optical flow can push mouth shapes and brows, but it can't push something that didn't exist before; a blink happens to hide the eye swap, and it happens anyway.
Lay out motions myself, following the rhythm of professional work
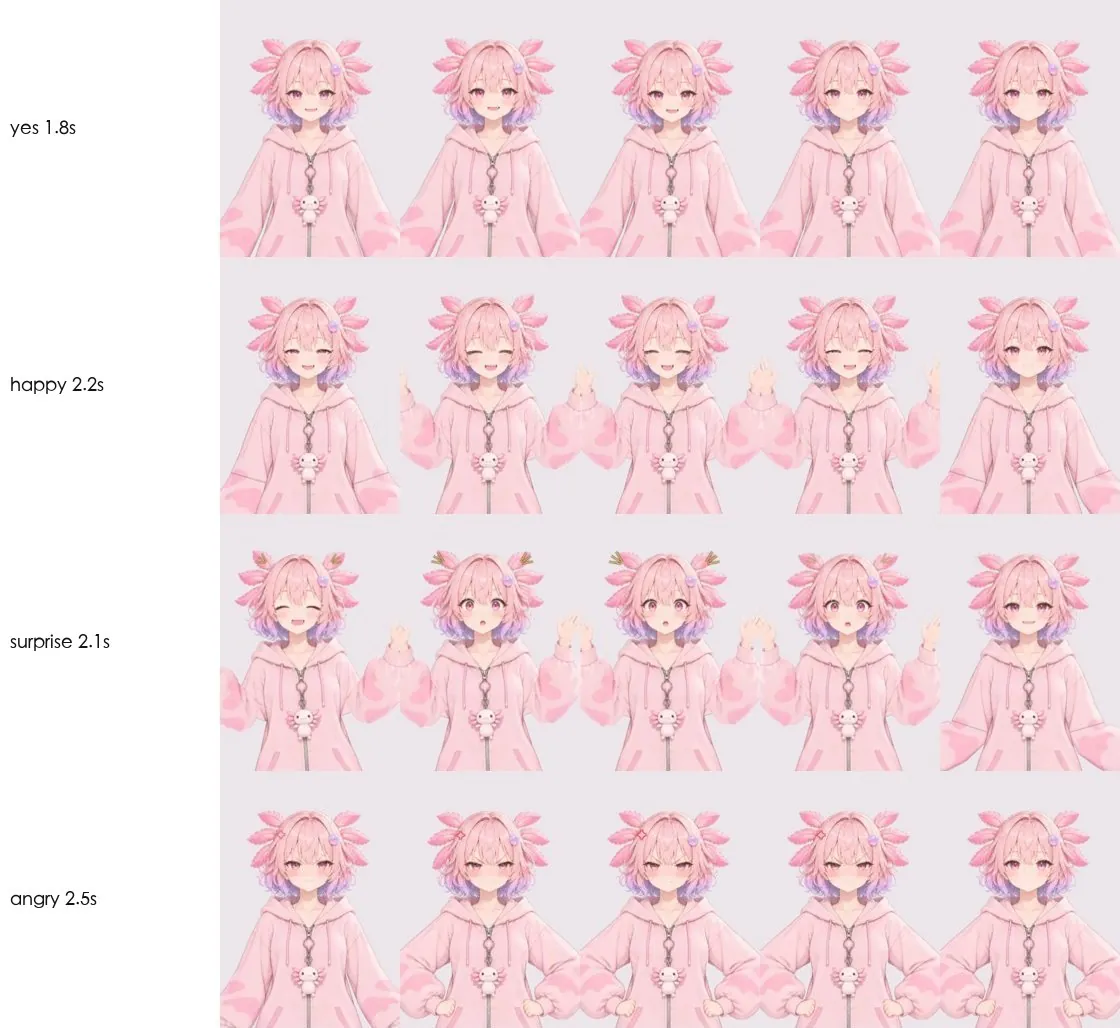
What makes a motion good is its rhythm: I take the rhythm from professional work and lay out the keyframes myself.
Method
- Look at the official samples' motions and distill the shared rhythm, without taking any single curve
- For each motion, lay out the keyframes myself: one timeline each for head, body, gaze, gills, expression and hand pose
- Happy motions follow four beats, “wind up → spring up → hold → hair sways along”, with the emotion left to the expression
- The expressions and hand poses a motion needs reuse the sets made in Steps 5 and 6
Acceptance
Each of the 26 motions was sampled at 1/4, 1/2 and 3/4 of playback; parameters moved in all of them, with 0 page errors. For the 23 I laid out myself, I compared them against the old curves one by one: none of the 85 same-named curves was left unchanged.
Why
The first version of the cheer was laid out by feel and rejected outright; only after looking at the official 290 motions did I find that happy motions all share a fixed four-beat pattern. At first I applied the official curves directly, then checked the license and found I couldn't, so I had to redo them all.
Hook up the camera, with the face and upper body on two paths
The face and body each go their own way, so if one path loses tracking, the other keeps moving.
Method
- Run two tracking models in the browser: one watches the face, one watches the body
- Each path is centered and smoothed on its own: the pose held still for the first second counts as the front, and afterward I measure how far you differ from it
- Direction is mirrored: if you move left, Kano also moves left on screen
- Small arm movements are followed directly; a raised hand has to go past a threshold and pause before it swaps to the Step 5 pose image
| Part | Method | Reason |
|---|---|---|
| Head angle, blink, mouth, brows | Tracked (face model) | — |
| Ears, shoulders, elbows, wrists, one on each side | Tracked (body model, 8 points) | — |
| Front-to-back depth of the arms | Only half is used | A forearm raised straight gets read as pointing at the camera |
| Side bend, twist | Capped at ±5°, ±12° | The puppet can't turn any further |
| Hips, legs | Not tracked | A laptop camera can't see them, and the points drift around |
| Fingers | Not tracked | — |
Acceptance
Live calibration: all 8 items are in the right direction (shrug, side bend left and right, shoulder turn left and right, raise left hand, raise right hand, both arms out to the sides). I also shot a test video of a known motion with Hina's 3D model and compared the 2D and 3D versions segment by segment.
Why
The face model loses tracking on a side profile; if the body were tied to the face on the same path, the hands would stop as well.
Put it on the web
Three things had to be solved before putting it on the web: the original can't be handed out as is, loading is too slow, and one library quietly connects to the outside.
Method
- The public version gets three layers of protection: each layer's texture is shrunk to one third of the original in width and height and the mesh is made coarser, while the original stays on my own computer; the assets are encrypted and sent in chunks; and every layer carries an invisible watermark and signature
- On load, a preview image is shown first and is replaced once the puppet is ready
- Textures switch to lossless WebP
- The tracking library sends usage statistics to an external server every 60 seconds with no off switch, so I answer those requests directly inside the page
| Original | Public version | |
|---|---|---|
| Vertices | 15,495 | 8,254 |
| Textures | 3.0 MB | 205 KB |
| The face layer | 281×316 px | 93×104 px |
Acceptance
- With the connection throttled to 20 Mbps, the full version's load time dropped from 17.5 seconds to 5.4 seconds (measured 2026-10-12)
- With the camera on for 75 seconds, 0 outbound requests
- After switching to the public version, 42 fixed poses compared with the original showed a minimum outline overlap of 0.986 (measured 2026-10-14)
Why
A puppet that moves on a web page ends up as files on the reader's computer, so the three layers of protection can only raise the bar, and the cost is a blurrier close-up. Lossy compression drifts by 12–21/255 at layer edges, so I used lossless; and although the usage statistics are only 89 bytes and contain no images, for “images never leave the browser” to hold, not a single request can go out.
What's not finished
Kano still has five known flaws, which I'll list up front:
- A faint pale ghost inside the mouth when crying and yawning
- At a 30° head turn, the cut on the far-side bangs shows jagged edges
- A side bend brings out a twist, and since the puppet's cap is small, it is quite noticeable
- The mouth shapes for “ee”, “eh” and a smile can't be told apart, and getting them right would need audio-driven lip sync
- Fingers aren't tracked; once the elbow leaves the frame, the hand stops moving
Pitfalls I hit
Most of the problems I ran into fell into the seven categories below. For each one I only write what you'll see and how to prevent it.
Using fades and image swaps to do what should be a “move”
What you'll see: double images, a translucent frame, two mouth lines.
How to prevent it: move vertices whenever you can; if an image swap is unavoidable, hide it in a blink or in the whip of a hand (Steps 4–6).

Asking for things that aren't in the picture
What you'll see: the head turns like a sheet of paper, a raised hand looks like cardboard, and a wide-open mouth has a ghost inside.
How to prevent it: fill in hidden areas first; swap in a different image for motions beyond what bending can cover; don't force a push where it can't produce the result (Steps 2, 5, 6).
AI image edits and layer splits redraw things as a side effect
What you'll see: areas you didn't ask to change got changed, split-out layers have different colors from the original, an extra pair of hands appears, and a faint haze surrounds a layer.
How to prevent it: change only one thing per image; use alignment thresholds to block shifts and scaling; have a person look at images with wrongly drawn content; always use pixels from the original (Steps 2, 3).
Tuning by feel and only fixing symptoms
What you'll see: you only know it “doesn't look right” without knowing which layer to fix; the same flaw survives three rounds of fixes, for example a neck that grows longer as it turns.
How to prevent it: measure the professional sample first and turn “looks right” into numbers; if the same spot is still wrong after two rounds of fixes, change the method itself, for example swapping translation for rotation (Steps 1, 4).
Blind spots of the tracking models
What you'll see: the hands stop when the face is in profile, points outside the frame drift around, a straight raised hand is read as pointing at the camera, and a mere side bend makes the puppet turn its body.
How to prevent it: put the face and body on two paths; track only points the camera can see; discount unstable depth; and write down the limits you can't get past (Step 8).
The acceptance conditions differ from what a viewer sees
What you'll see: the numbers all pass but the picture is still broken; the same check passes sometimes and fails other times.
How to prevent it: for things that move, look at continuous playback or frame by frame, not a single image; measure under the viewer's conditions and read back the settings that actually took effect; measurements taken while the machine was busy don't count, so rerun them when it's idle.
After it goes on the web: licensing, privacy, being downloaded
What you'll see: the sample assets turn out not to allow this kind of use, a library quietly sends data outside, and the original assets get downloaded directly.
How to prevent it: read the license before using assets; measure outbound requests with the page open; lower the resolution of the public version and encrypt it, which is why Kano on the web looks blurry up close (Steps 7, 9).
Try it
- Press “Camera” to turn on your camera, and Kano will turn her head, blink, and move her hands along with you; the video is processed only inside your browser
- Press the motion buttons to play motions; when the camera is off, she looks at your cursor
To lower the risk of the puppet being downloaded directly, the web version's textures are shrunk to one third of the original, so it looks a bit blurry up close. That is normal.
Copyright notice
- Kano's character design, layers, meshes, expressions and motions © 2026 JonesHong. For viewing on this page only; no downloading, reposting, redistribution or derivative works
- Web rendering: PixiJS (MIT)
- Camera tracking: MediaPipe Tasks Vision with the Face Landmarker and Pose Landmarker models (Apache-2.0, Google)
Compare your character against the ratio table
The ratio table, the list of hidden areas, and the camera's 8 points: these three are the easiest to take and compare against your own character.
Paste the passage below to your AI and have it check the 2D character you have.
Further reading
| Resource | Why it matters |
|---|---|
| The Hina post: from one design sheet to 3D | The 3D edition of the same Method / Acceptance / Why structure. The test video in Step 8 was shot with her model |
| See-through: Single-image Layer Decomposition for Anime Characters | The layer-decomposition model used in Step 3. The layers it produces are redrawn, which is why Step 3 swaps the visible pixels back to the original |
| Live2D official sample models | The source of the Step 1 ratio table. Measuring 12 of them together is what shows that “the closer to the camera, the more it moves” is a general rule and not one rigger's habit |