My Homemade Dress-Up Doll
From One Design Sheet to 3D
A workflow I worked out with Opus 5.5: turning one design sheet into a 3D dress-up doll that can change clothes, dance, and speak four languages in a browser, using ChatGPT, Tripo, Blender, and three.js. Each step includes the method, acceptance criteria, and why I chose it.
One design sheet, ten steps

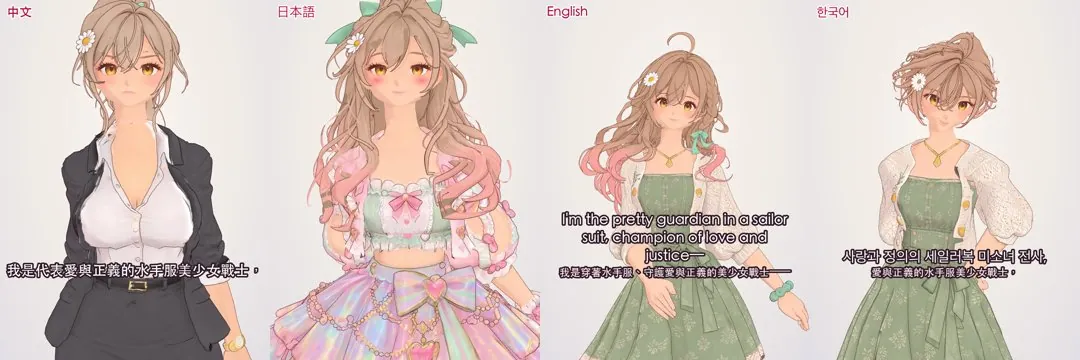
The video shows 陽菜 Hina in four looks, each speaking a different language: an OL suit with an angry expression in Chinese, an idol outfit with a shy expression in Japanese, short hair in Korean, and her original look in English. She is a 3D dress-up doll saved as a VRM, a common file format for 3D characters. I started on 2026-09-29 with a design sheet drawn by ChatGPT and finished the public version on 10-05; work stopped for a few days in between when my Claude Code quota ran out.

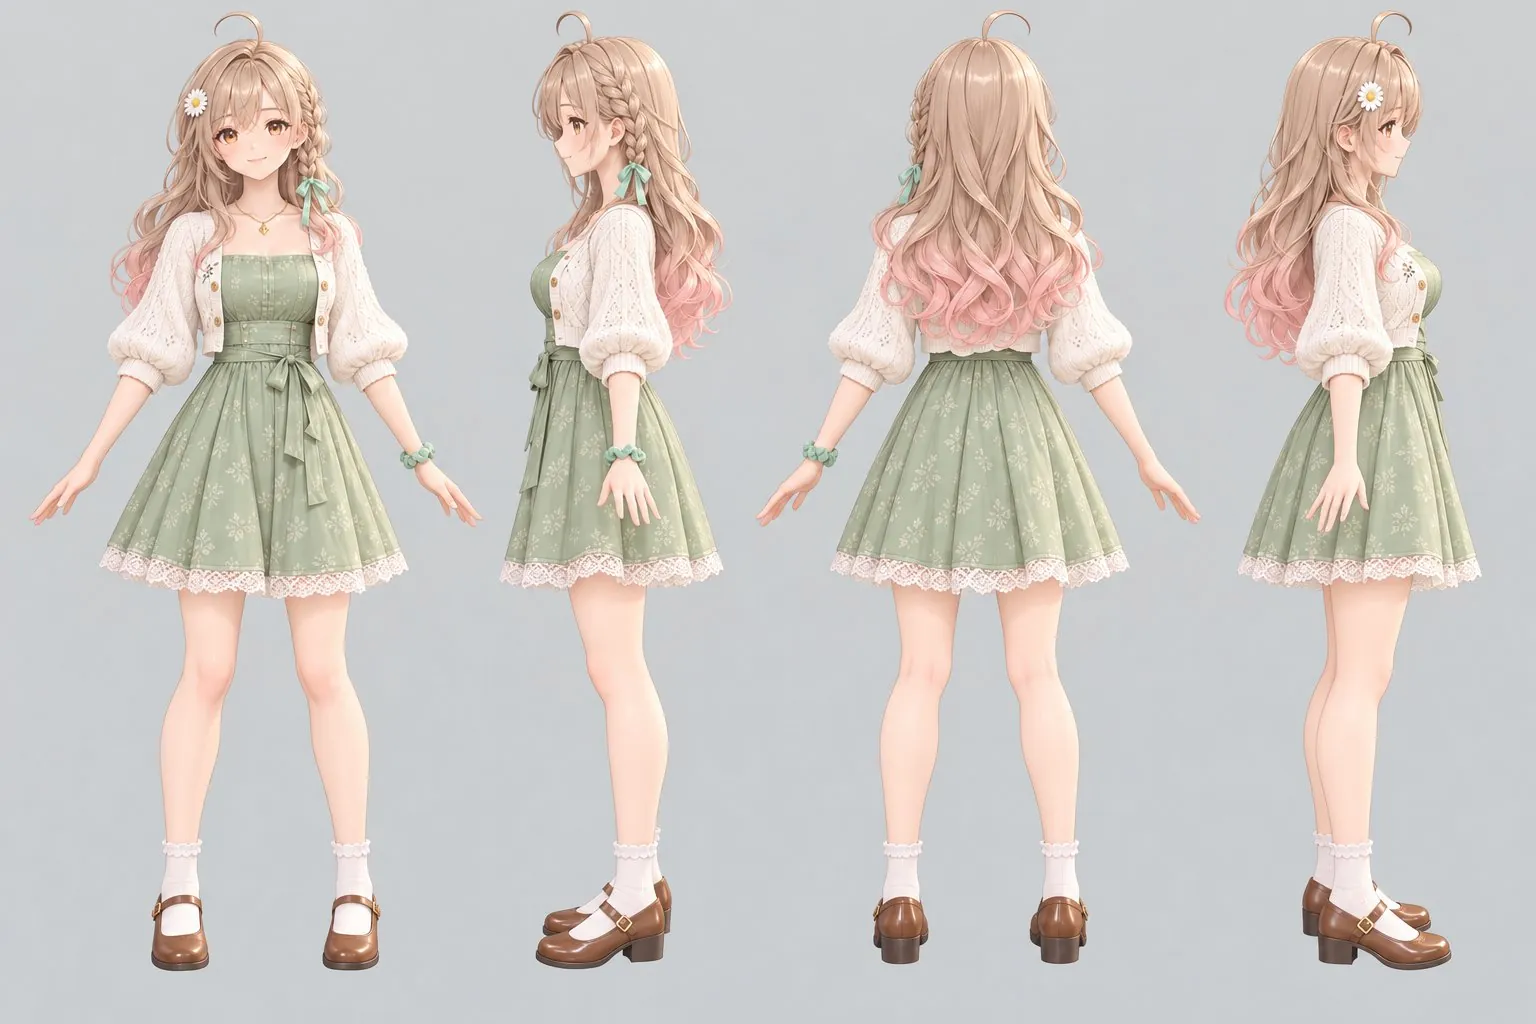
I completed the whole project by talking with Opus 5.5. This article organizes the methods that held up in testing into ten steps, each with three parts:
- Method: the steps to follow
- Acceptance: measurable criteria
- Why: what happened in testing that led me to this approach
Tools used: ChatGPT (design sheet and four views), Tripo (3D generation and Auto Rig), Blender (assembly and corrections), three.js and three-vrm (web rendering), ElevenLabs (voice), wav2vec2 (lip sync), and Mixamo (motion).
I reviewed the images and made the calls; Opus 5.5 did the hands-on work
We set the division of work on the first day and never changed it:
- Me: choose the design direction; review images and approve or reject each step; approve every use of Tripo credits; handle account sign-ins and payment
- Opus 5.5: write the Blender, measurement, and web code; run Blender in the background; operate the ChatGPT and Tripo websites; produce comparison images for me at each step
I had two rules for visual review:
- Acceptance images had to be at least 1024 px, with a separate enlarged crop of the face
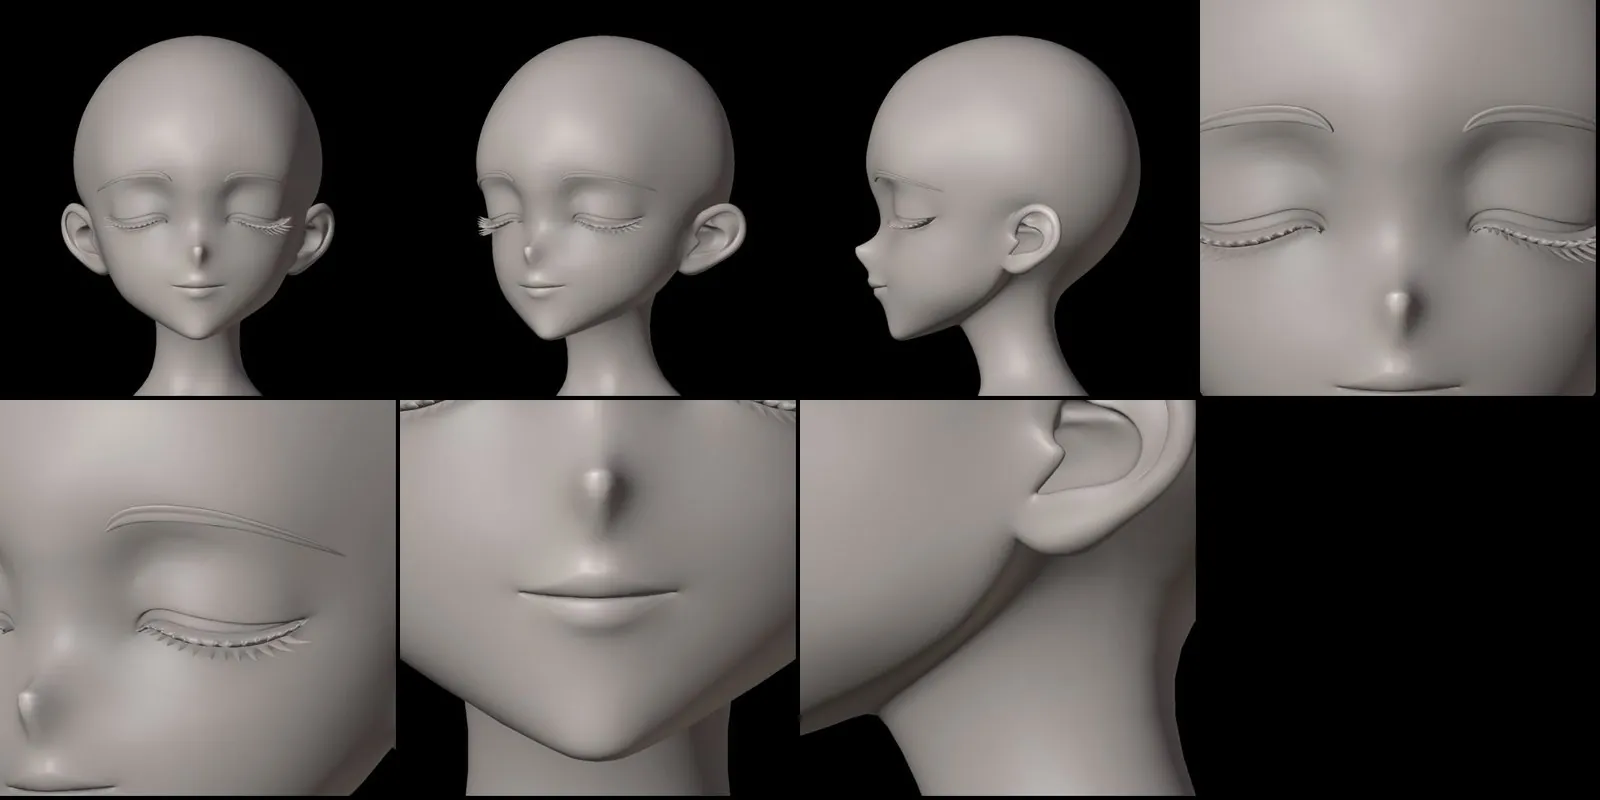
- The face had to be shown from the front, 30° left and right, and a full side view
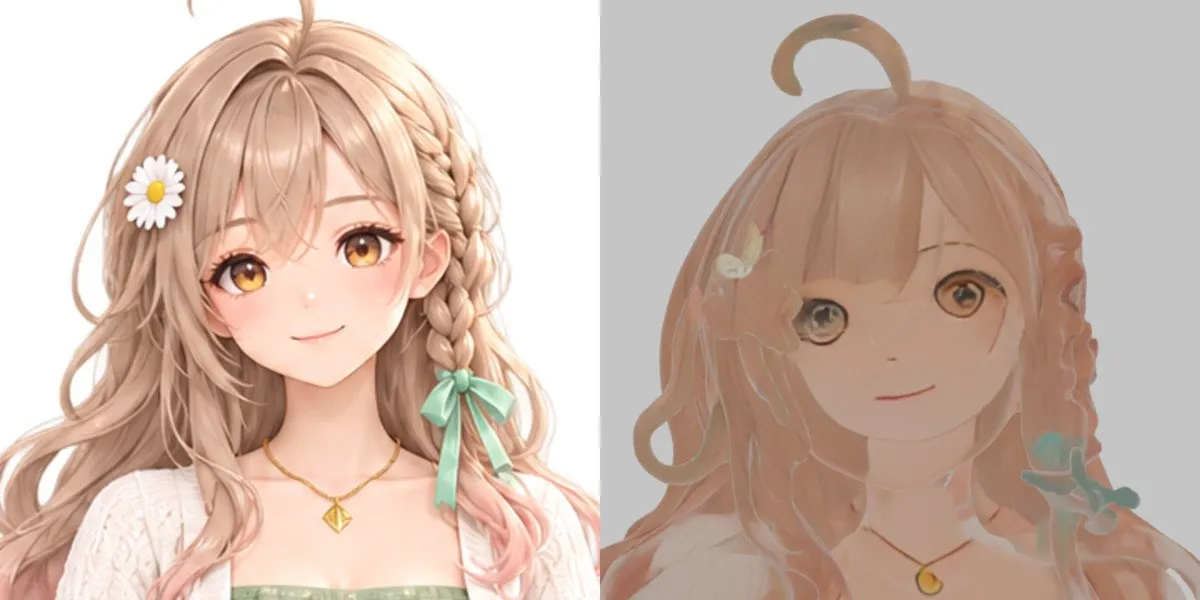
Why
In the first round, I tried to generate the whole model directly from one design sheet. That was too optimistic: the model had too few polygons and lacked detail. I switched to generating the head, hair, and body separately, then merging them.
Set a quality benchmark first
Method
Before starting, I put the official three-vrm sample model in the same preview page, took a screenshot, and agreed that this was the quality level to aim for.
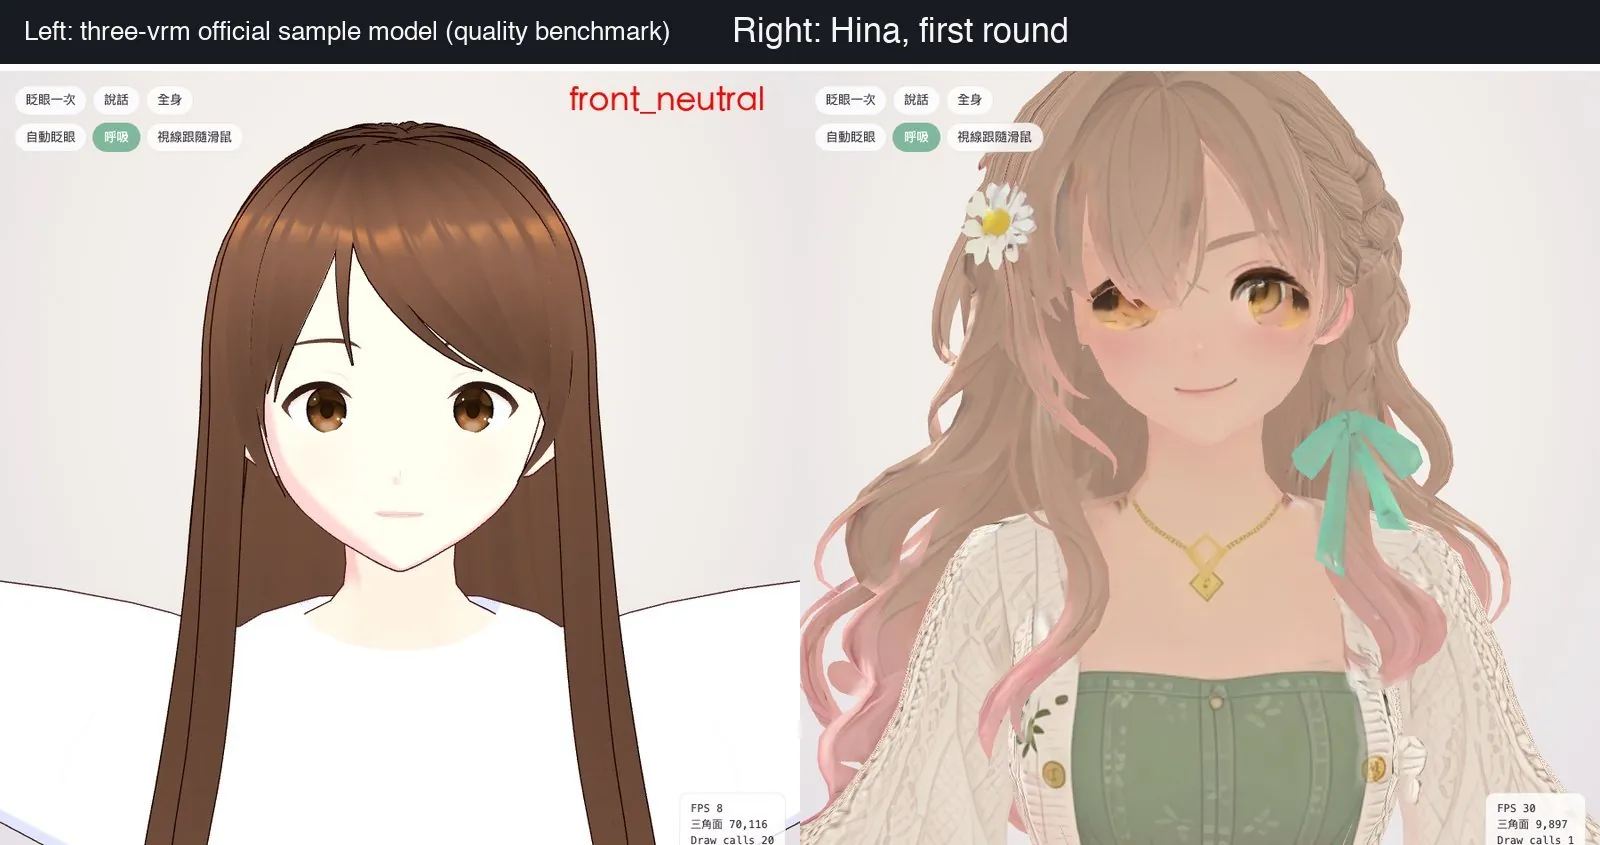
Why
I had no benchmark in the first round. Only after putting the model on the web page did I see how far off it was. Two creators I used as references also said the result was still rough; one said it “could not hold up to a close-up”. Expectations needed to be clear before I started.
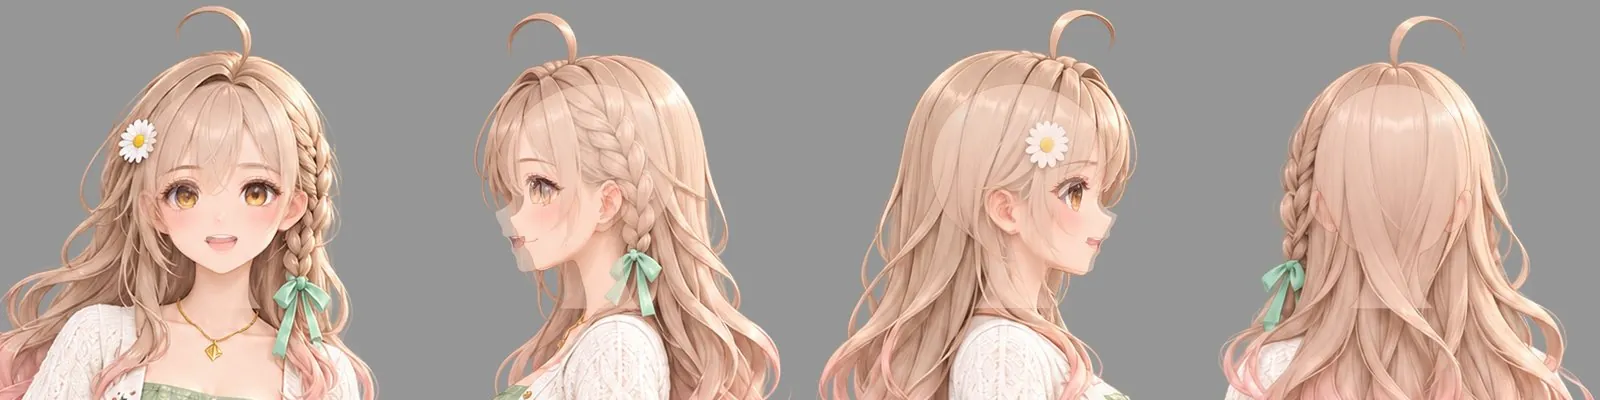
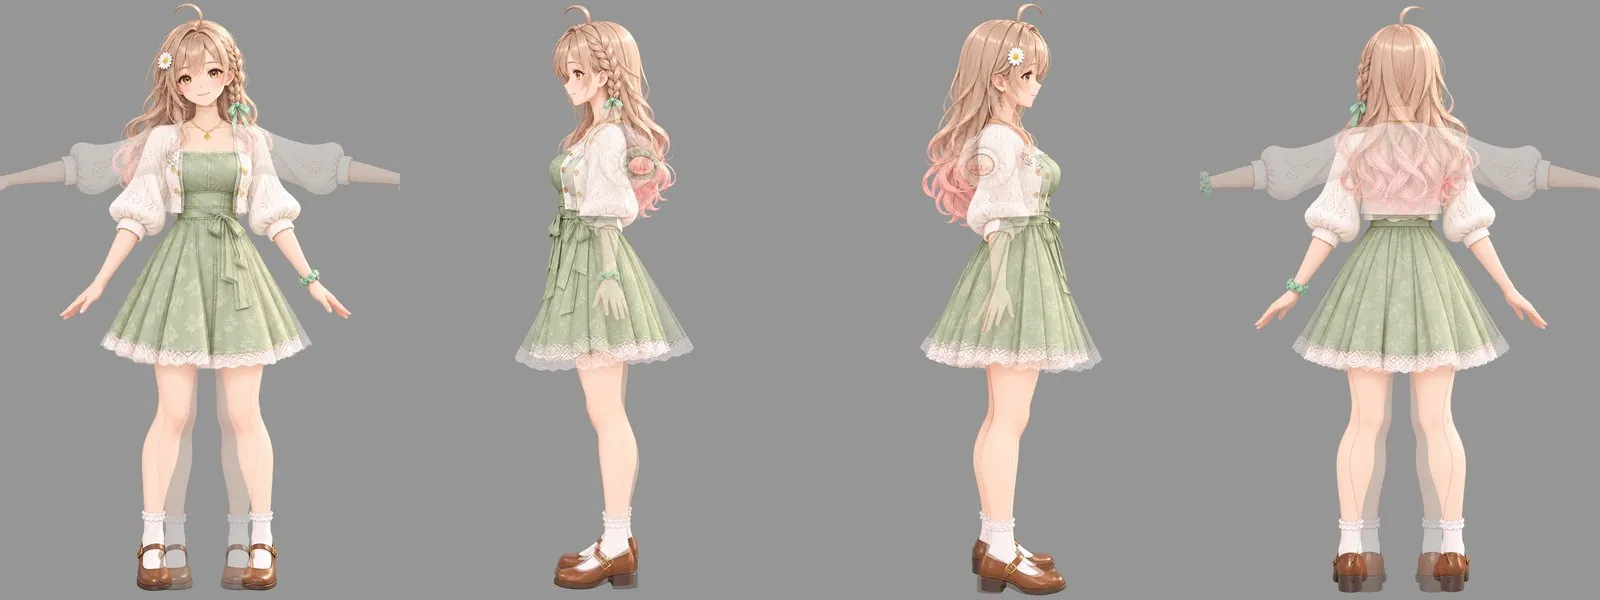
Draw three sets of four views
Method
- Ask ChatGPT to draw three sets of four views (front, left, right, back):
- Head: bald, with ears visible; eyes wide open so the whole iris is visible; mouth open in an “ah” shape, showing the upper front teeth and tongue; neck cut flat above the collarbones
- Hair: only the hair and hair accessories, hollow inside
- Body: T-pose; neck cut at the same height as the head
- Include the design-sheet view from the same angle with each image, and ask it to “edit the attached image”
- Start a new conversation for each image
- For the body's side view, specify that the “arm faces the camera directly”
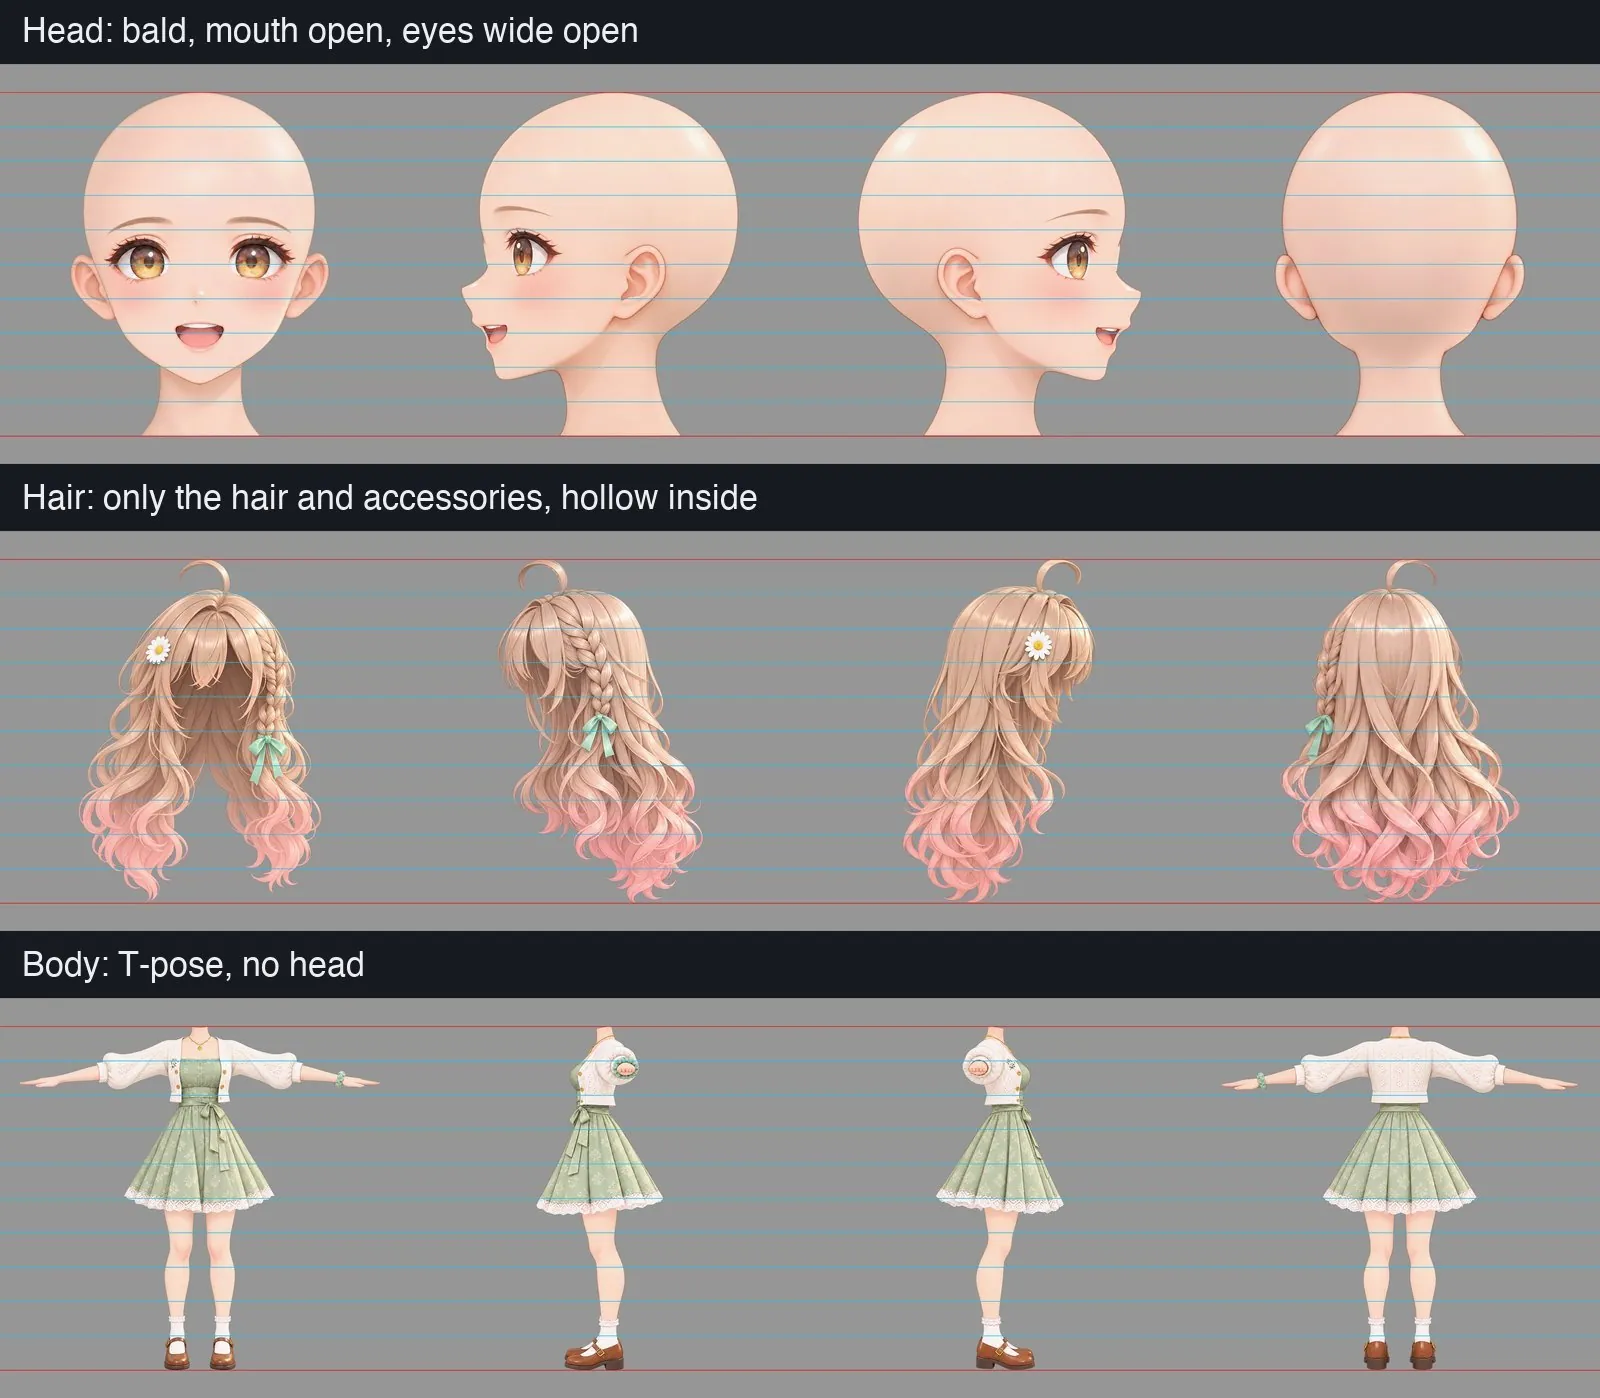
Acceptance
- The heights of the top of the head, chin, shoulders, and soles differ by less than 2% of the image height across the four views
- In the left-side view, the character's face points toward the left edge of the image
- The accessory count is the same in all four views
Why
- Generating the head with its mouth open creates 3D meshes for the teeth, tongue, and oral cavity. I can close an open mouth later, but I cannot make an oral cavity from a closed-mouth head
- The hair views drawn from text alone looked very different from the design sheet
- Continuing in the same conversation to generate a side view produced a 3/4 view; without an explicit instruction for the body's side view, the arm extended backward
- The design sheet itself can contradict itself: the nose tip in the side view is at 44% of the distance from eye to chin, but at 27% in the front view. I used the front view as the reference
Generate with Tripo; add textures last
Method
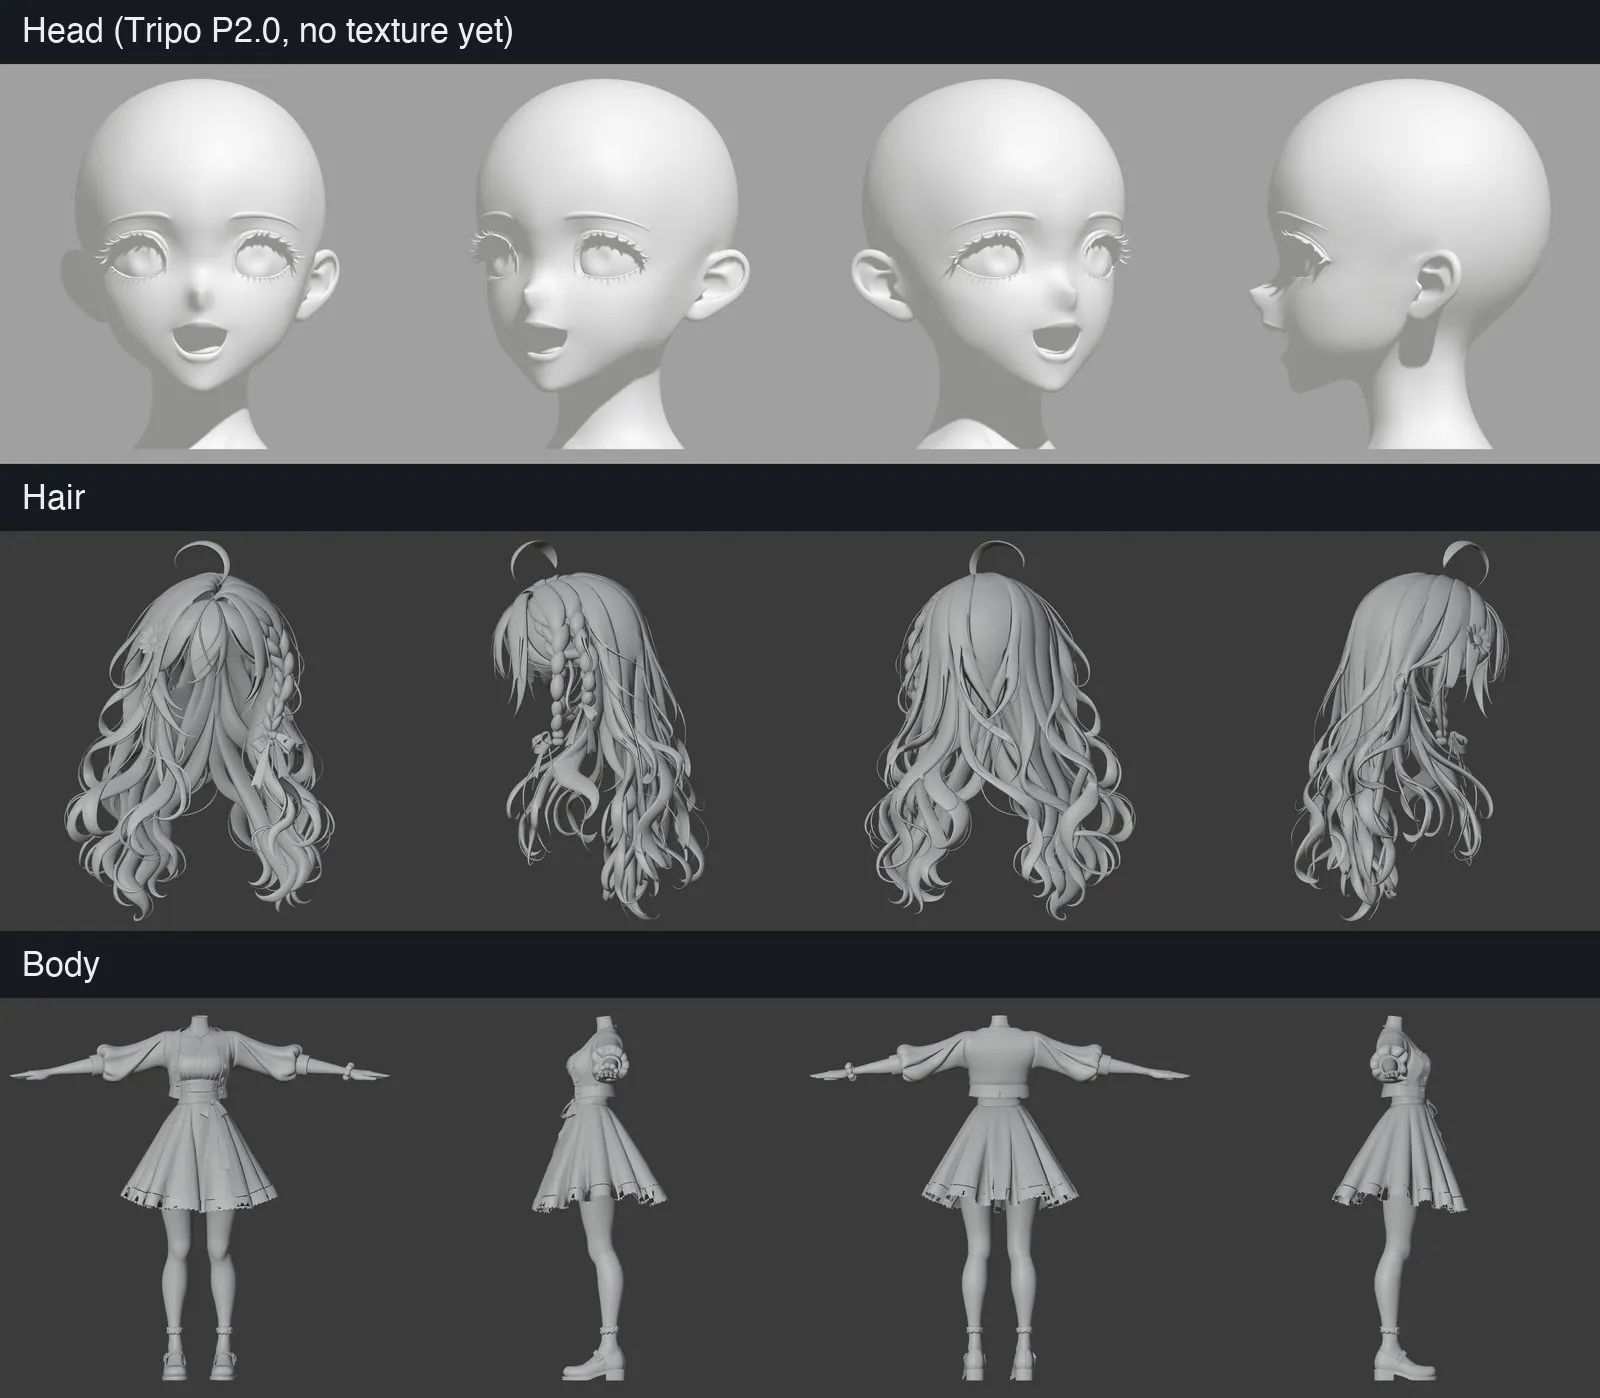
- Use Smart Mesh P2.0 multi-view and submit one part at a time: head → body → hair. Each part costs 100 credits
- Before every submission, reset four settings: model P2.0, the second upload-box icon (multi-view), 25,000 polygons, and privacy Private
- Generate only the mesh first. After assembly and proportion fixes, add textures last (20 credits per part), then transfer the UVs back to the edited mesh by vertex position
Acceptance
Count the polygons after downloading: each part should have about 25,000 quads. If it has only 5,000, the setting was reset.
Why
- The page reverts to its defaults on every load, and the default polygon count is 5,000
- The third upload-box icon is batch mode: it generates a separate model from each of the four images and charges 300 credits
- The head is hardest, so I generated it first; if it was unsatisfactory, I only had to regenerate the head
- In my tests, adding a texture did not change the mesh: all 52,220 faces of the head could be matched, and vertex positions stayed the same; vertices were only split along UV seams. That meant I could safely edit the mesh first
- The Left slot needs the character's own left-side view. I reversed it in the first round, putting the side of the face on the back of the head and wasting 360 credits
Assemble to the heights in the design sheet
Method
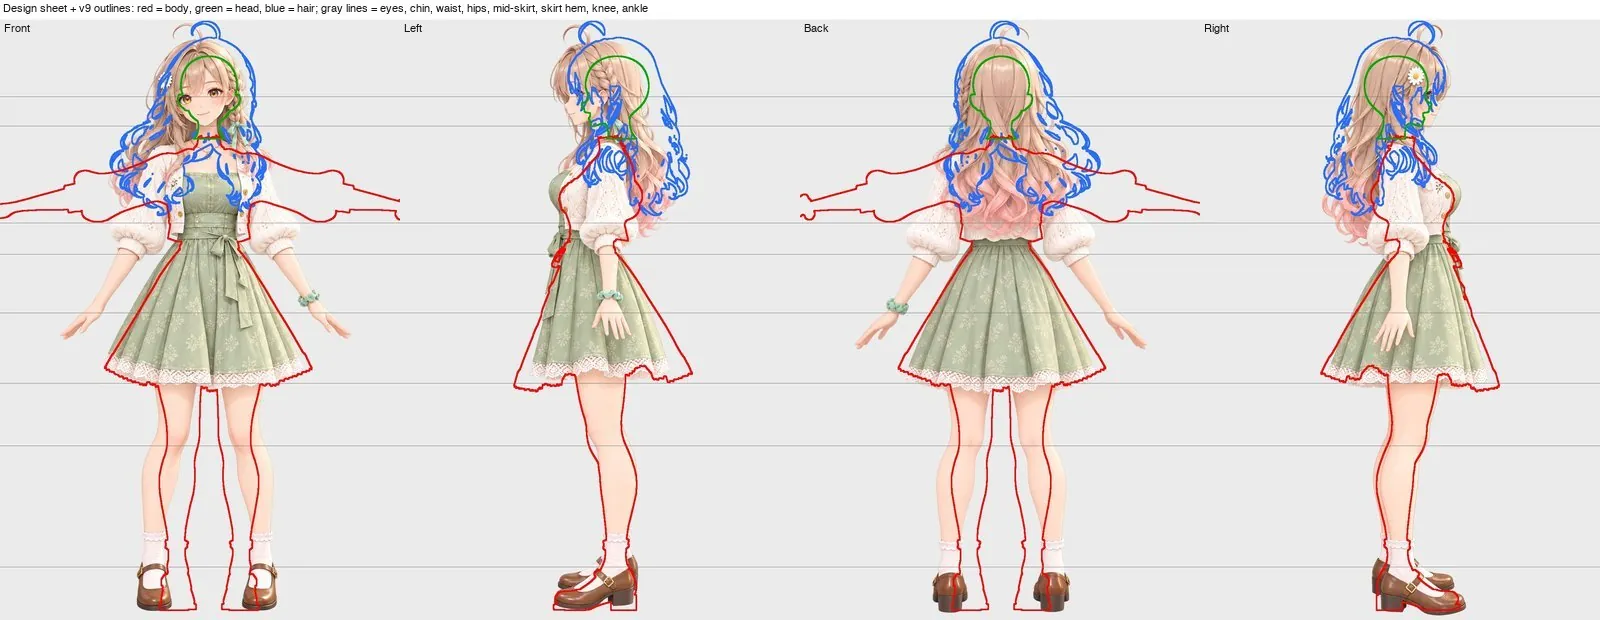
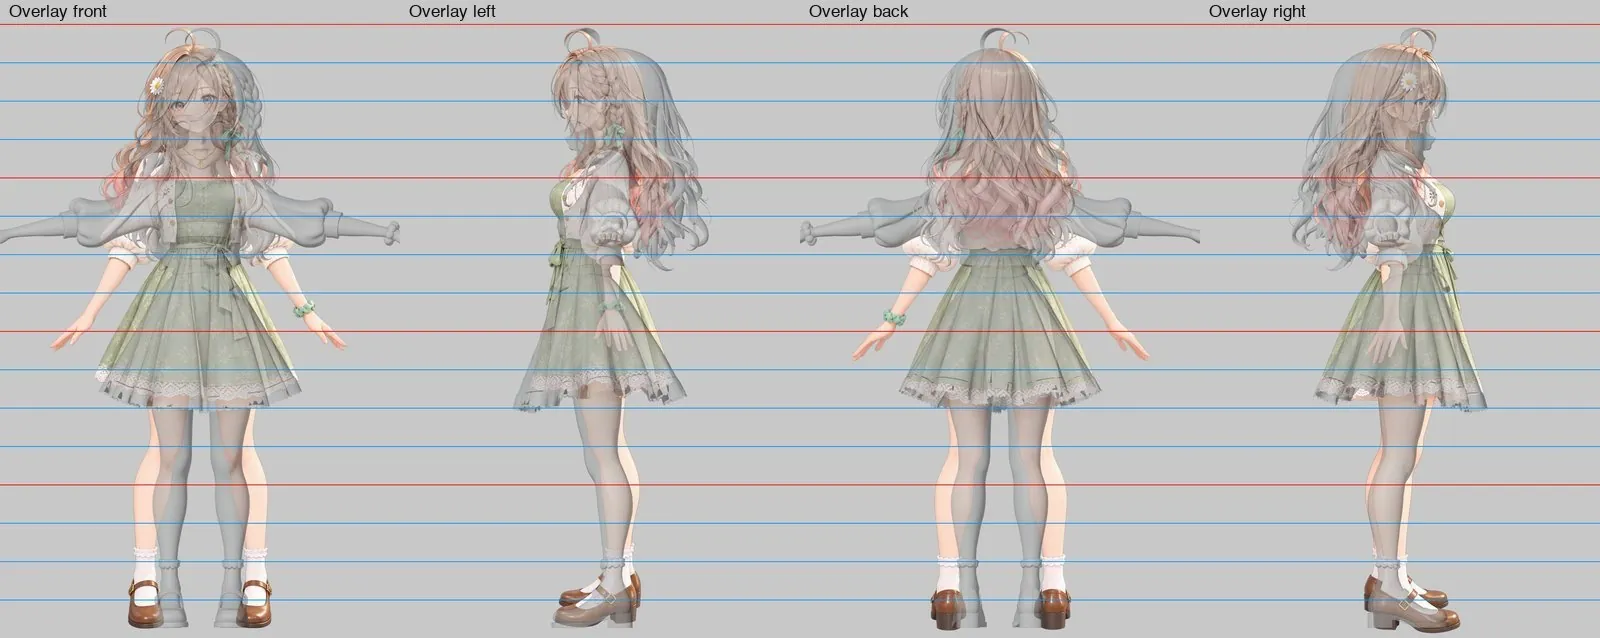
- Measure the pixel heights of the top of the hair, eyes, chin, and base of the neck on the design sheet
- Use the skirt hem and shoe soles to convert pixels to meters (0.785 mm per pixel this time), and place the three parts at those heights
- Compare the model's outline width with the design sheet row by row and list the differences
- Fix one area at a time, rerun the whole table, then move to the next area
- When the front and back views disagree, take their average
Acceptance
Rerun the comparison table after each fix and show me before-and-after images.
Why
- Scaling to match the neck width made the head 1.4 times its proper size. The generated neck was narrower than the body's neck section
- The first comparison table showed more than a dozen differences, but two were measurement errors: the chin was supposedly “22% too narrow” based on a number read by eye; remeasuring each column gave 70 versus 69 px. The ankle was supposedly “16% too thin,” but the measurement hit the shoe opening while the model's corresponding row was still on the sock. When a difference looks implausibly large, I check where it was measured first
- The design sheet's front and back views can conflict: the same skirt is 10% wider from the front than from the back
Fix the seam one layer at a time
Method
The head and body meet at the neck. I checked and fixed them in this order.
| Order | Layer | Check | Fix | Result this time |
|---|---|---|---|---|
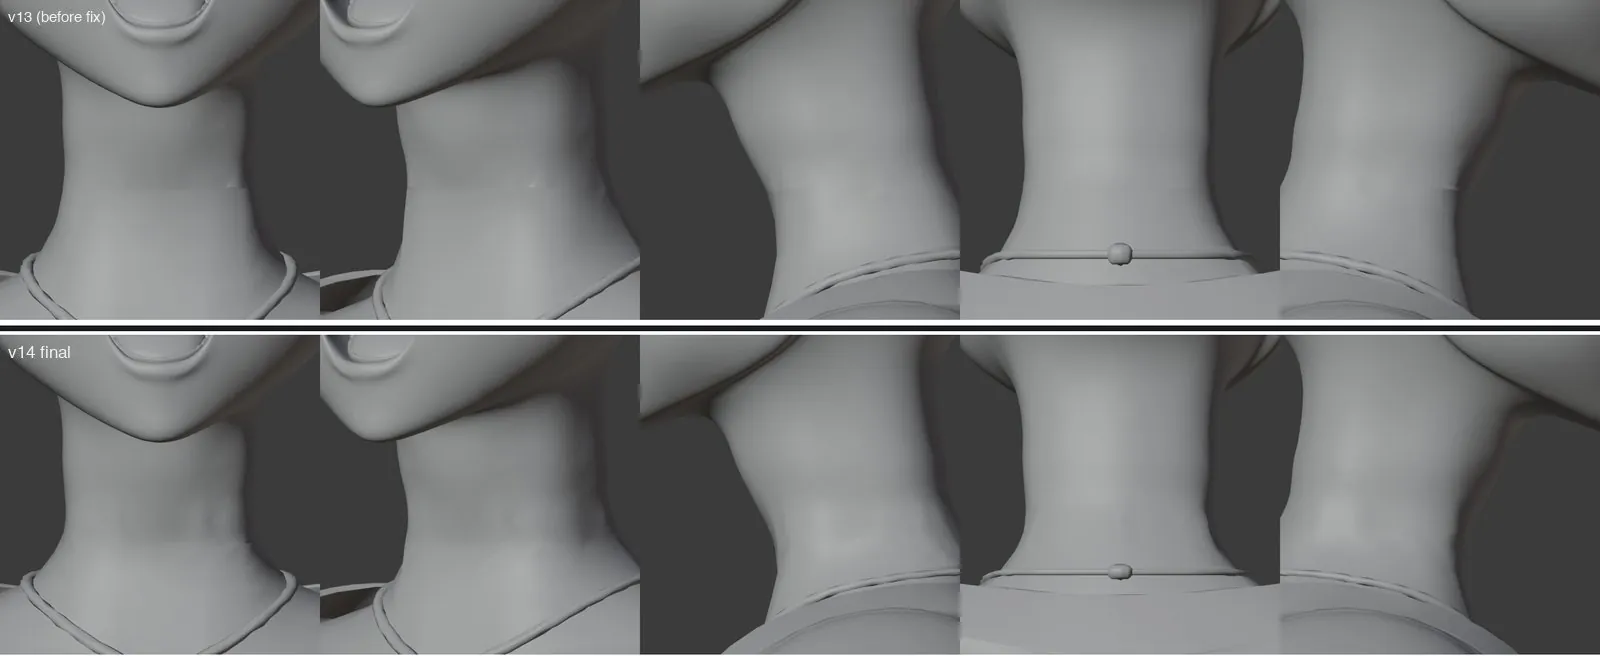
| 1 | Geometry | Sample points along the edges to measure the gap | Add each vertex from the head's edge loop to the body's cut edge | 0.19 mm → 0 |
| 2 | Normals (lighting direction) | Angle between normals on either side of the seam | Use the average normal from both sides at the seam | 22.2° → 0.01° |
| 3 | Texture | RGB difference across the cut | Multiply skin-colored pixels in the body texture by a gain for each channel | (13, 9, 11) → (1, 1, 2) |
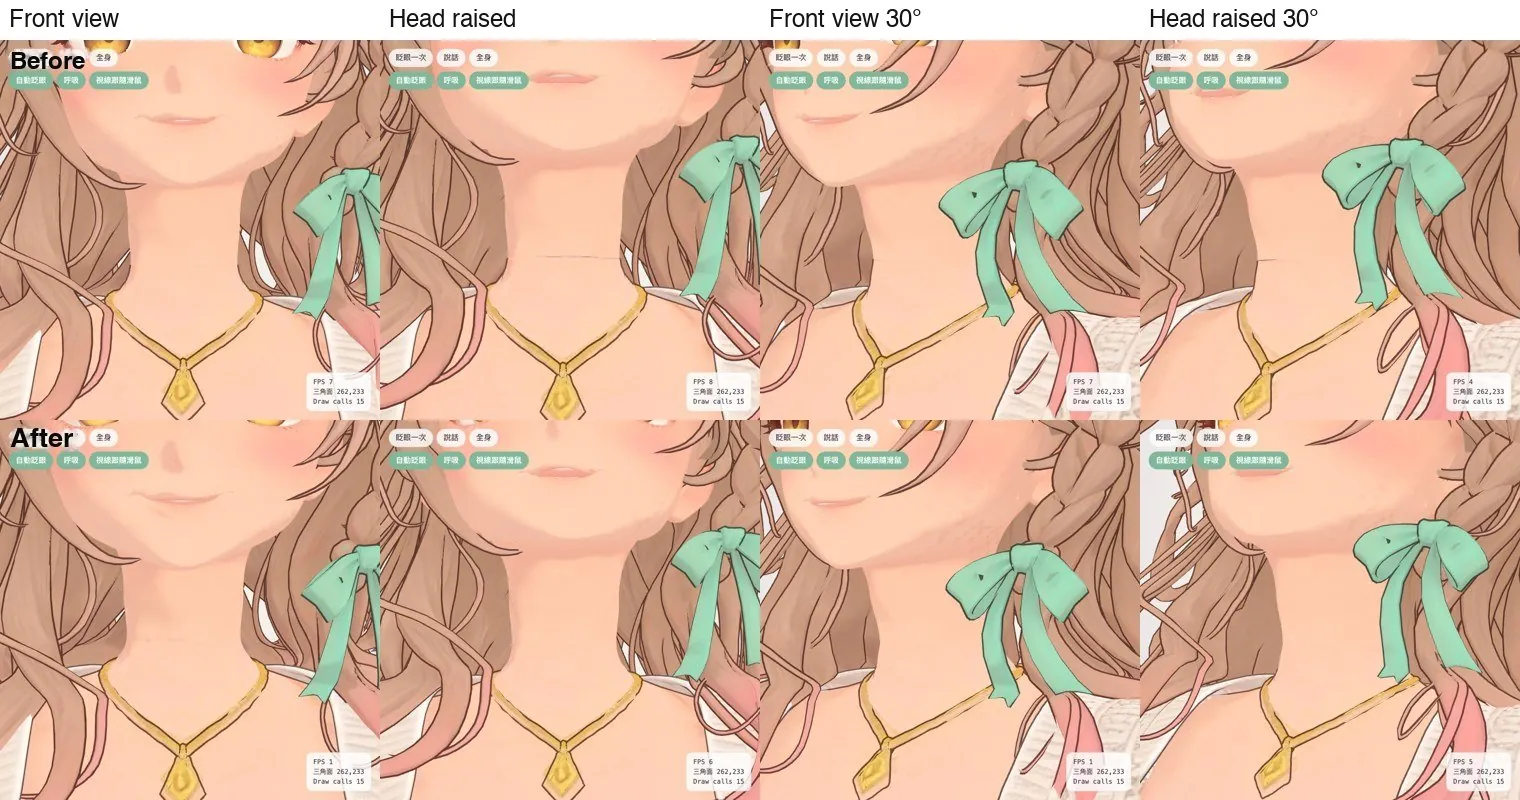
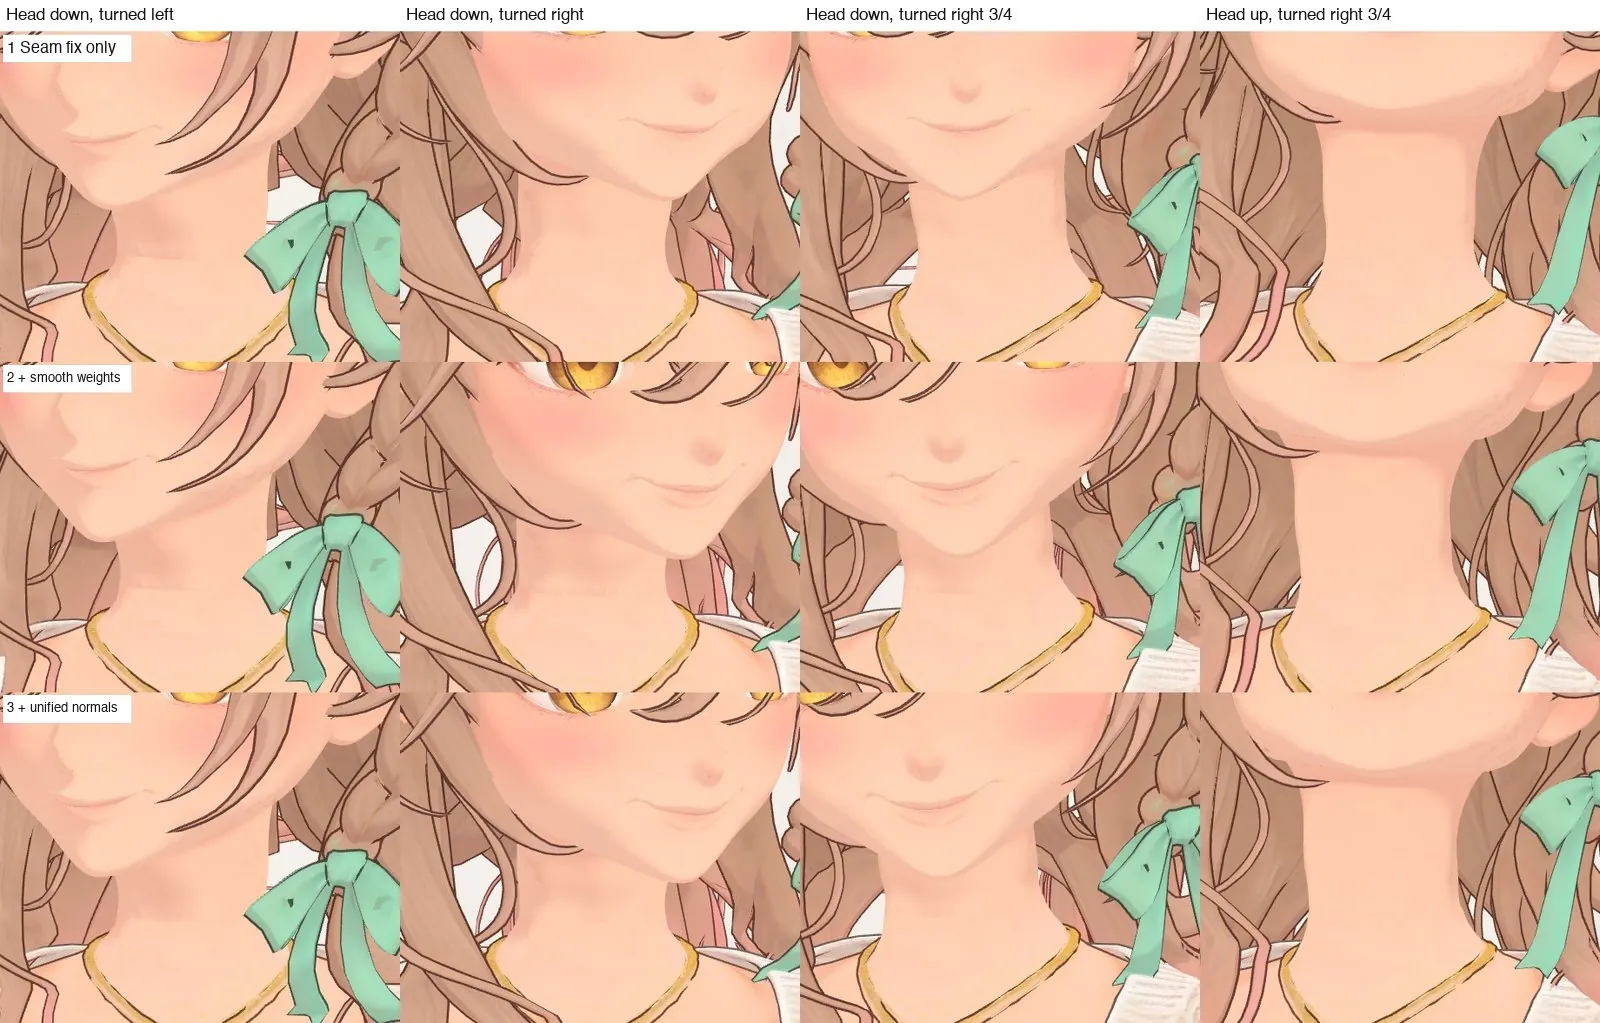
| 4 | Weights (which bone moves each point) | Maximum gap across seven poses | Snap the head's edge to the body's edge, interpolate weights from the body, and blend back to the original weights over 15 mm upward | 3.27 mm → 0.001 mm |
| 5 | Outline | Visual check | Do not draw an outline within 1 cm of the seam | The black line disappeared |
Why
Because I generated the head and body separately, the seam caused a problem at every layer. Fixing one layer exposed the next. I fixed the weights twice: first for the gap when she raised her head, then for the crease under her chin when she looked down.
Rigging and spring bones
Method
- Reduce the whole model to 45,000 polygons and upload it to Tripo Auto Rig (VRM 1.0 humanoid skeleton, 20 credits)
- After downloading, try four 90° orientations and use ICP to align it with the original
- Interpolate from the nearest face to transfer weights back to the full mesh
- Set all hair weights to follow only the head bone
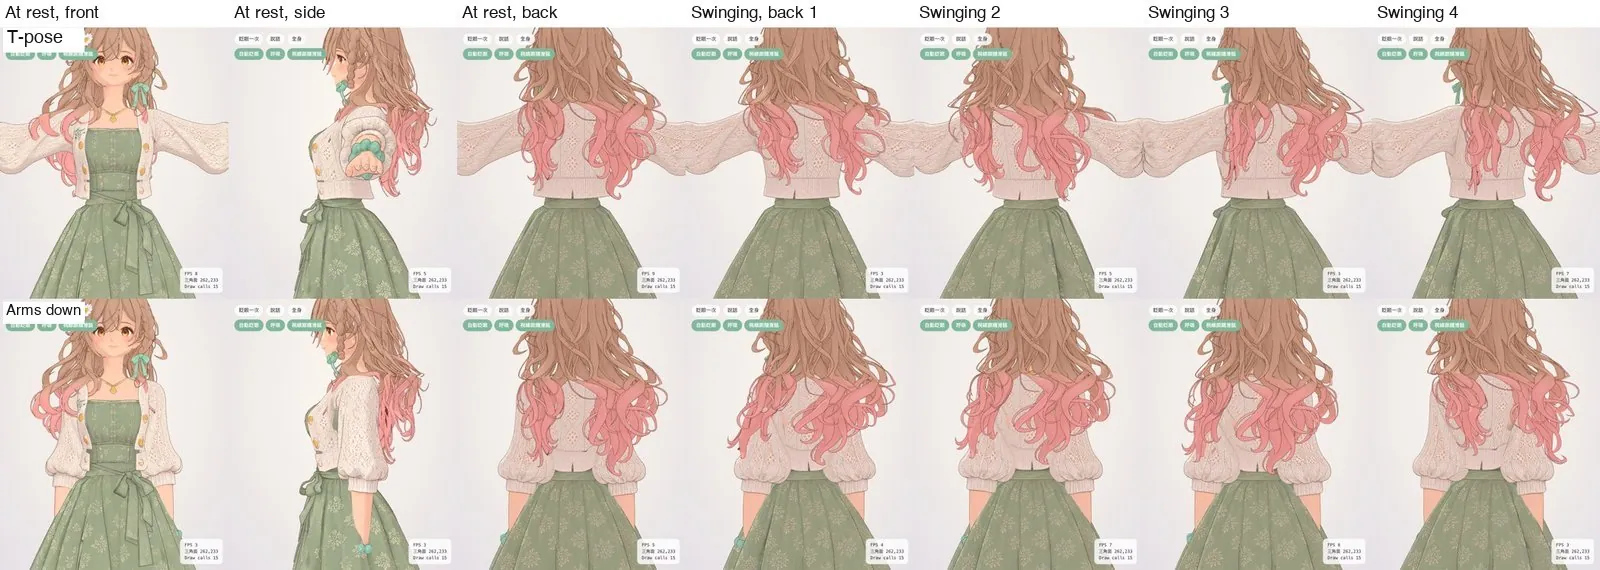
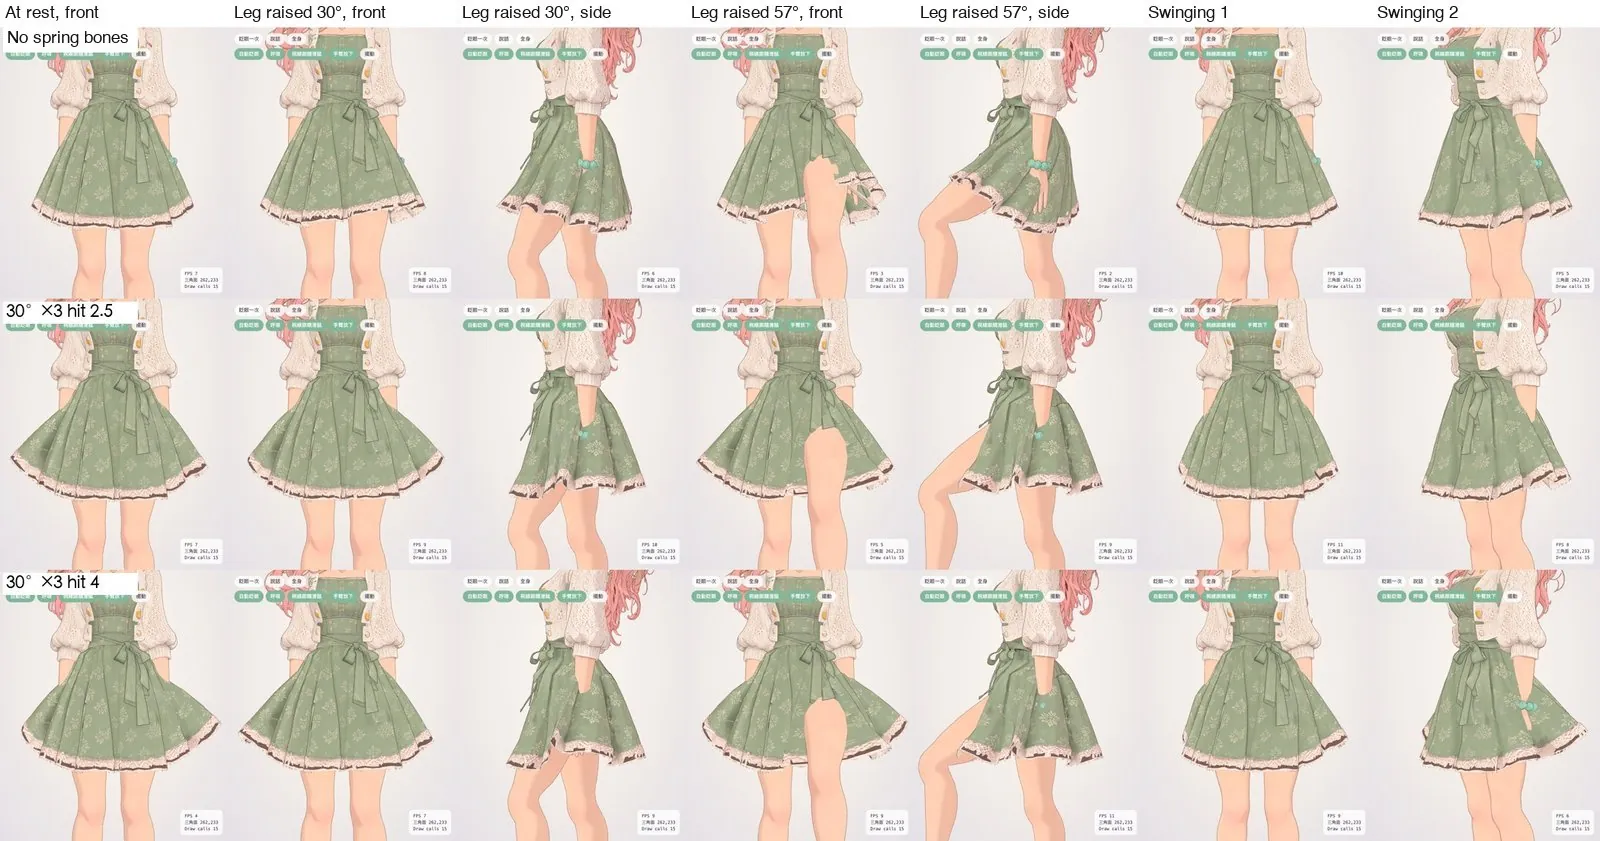
- Add spring bones: one chain around the head every 20° for the hair (13 chains, 5 segments each), and one around the hip every 30° for the skirt (12 chains, 3 segments each)
- Give each half of the skirt some weight from the thigh on the same side, based on height, up to half at the hem
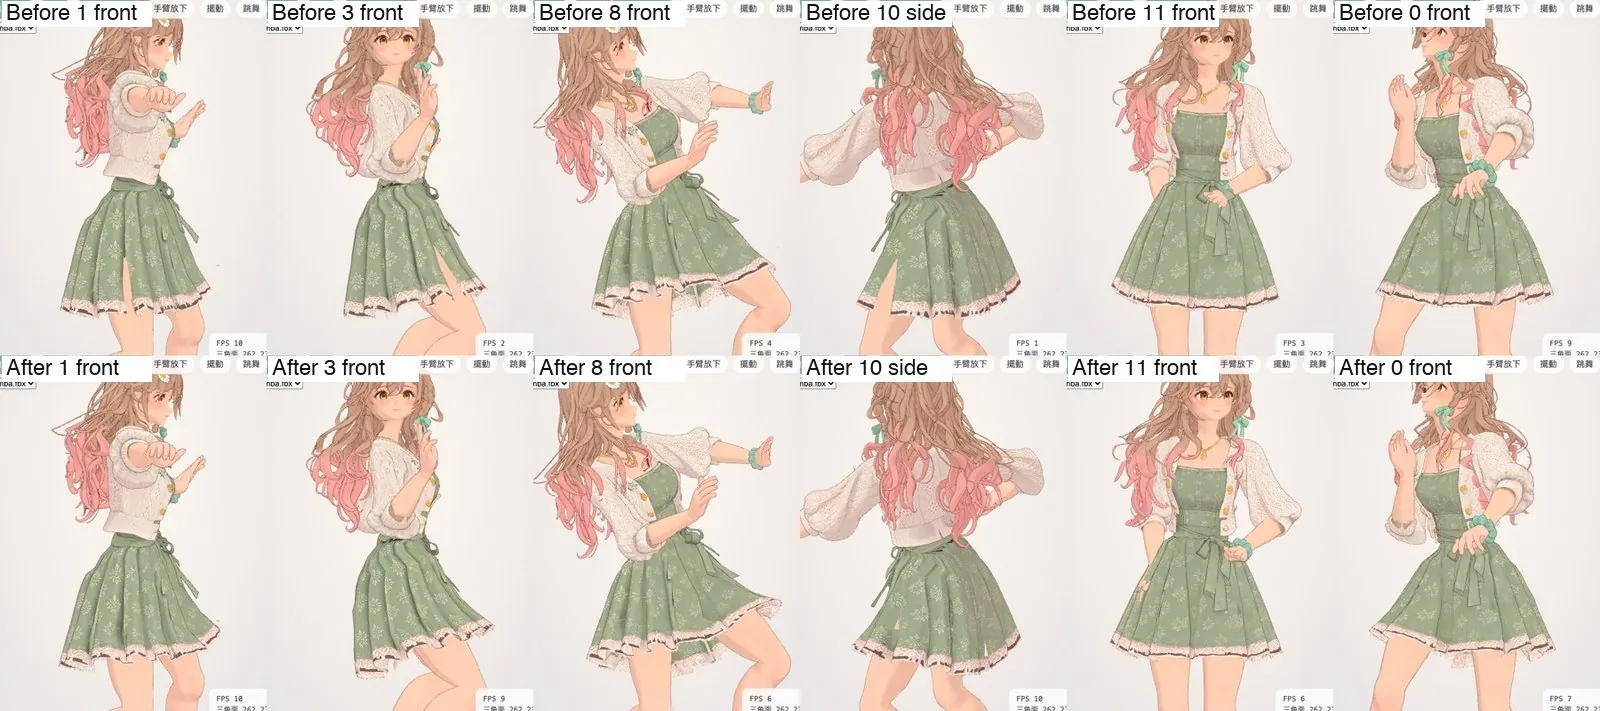
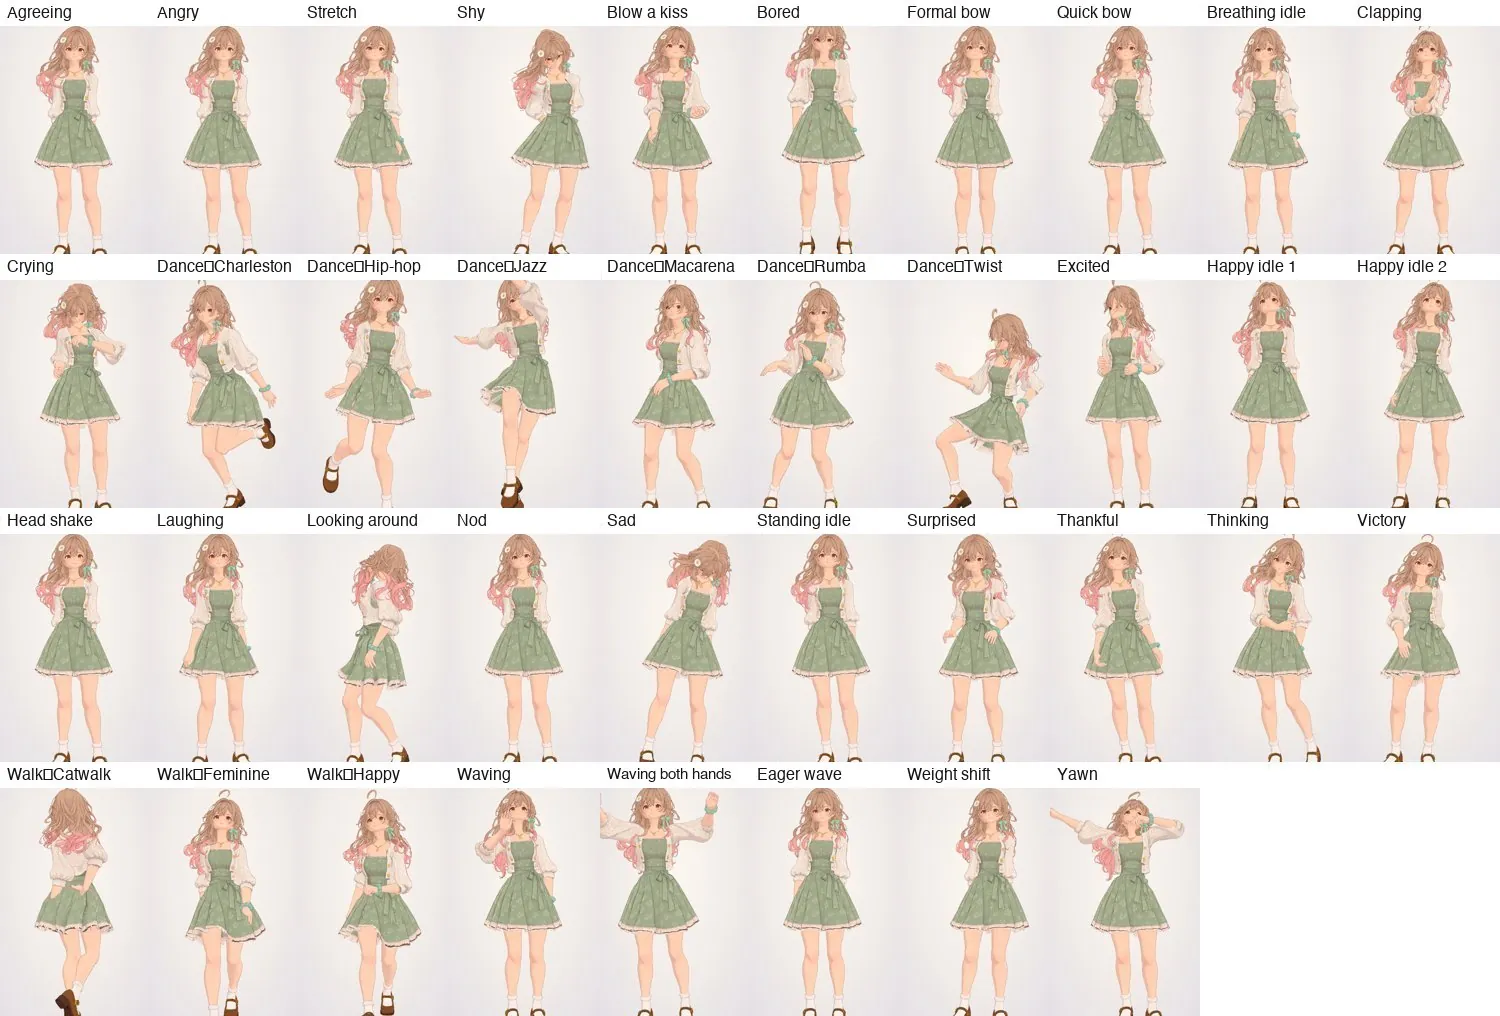
- Measure a torso outline (one layer every 2 cm, 36 directions per layer). When the hand enters that outline during web playback, rotate the upper arm outward by 4° at a time, up to 48°
Acceptance
- 0 vertices without weights, with an alignment residual of about 1 mm
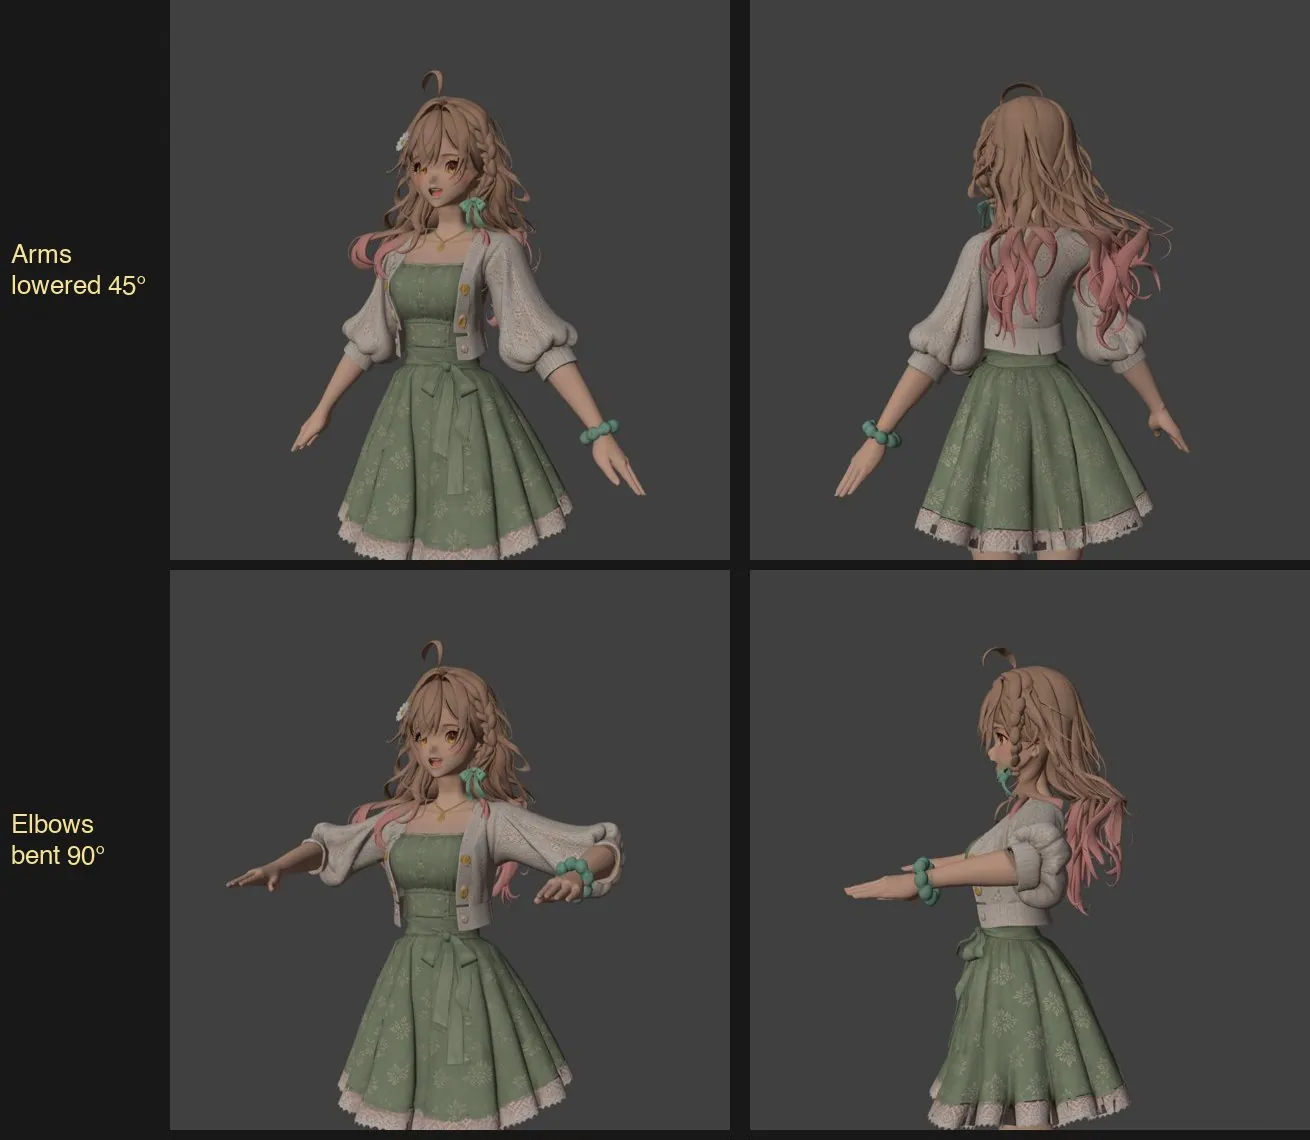
- Close-ups of six poses (arms lowered 45°, elbows 90°, knees 60°, waist turned 20°, head turned 30°, head nodded 15°), with intact joints and neck
- Across 36 test poses, the number of hand vertices embedded in the torso fell from 976 to 59
Why
- Sending the full 157,000-polygon model to Auto Rig triggered “Polygon Limit Exceeded”
- Tripo rotates the uploaded model and scales it down to 1 m tall
- With Tripo's hair weights, the bangs crumpled as soon as the arms were lowered
- I tried 20° × 4 segments for the skirt: the lining sat too close to the thighs, the collider shrank to 5 mm, and the thighs passed straight through
- Mixamo motions were made for a different body shape, so the hands intersected the chest and waist
Build expressions backward from an open mouth
Method
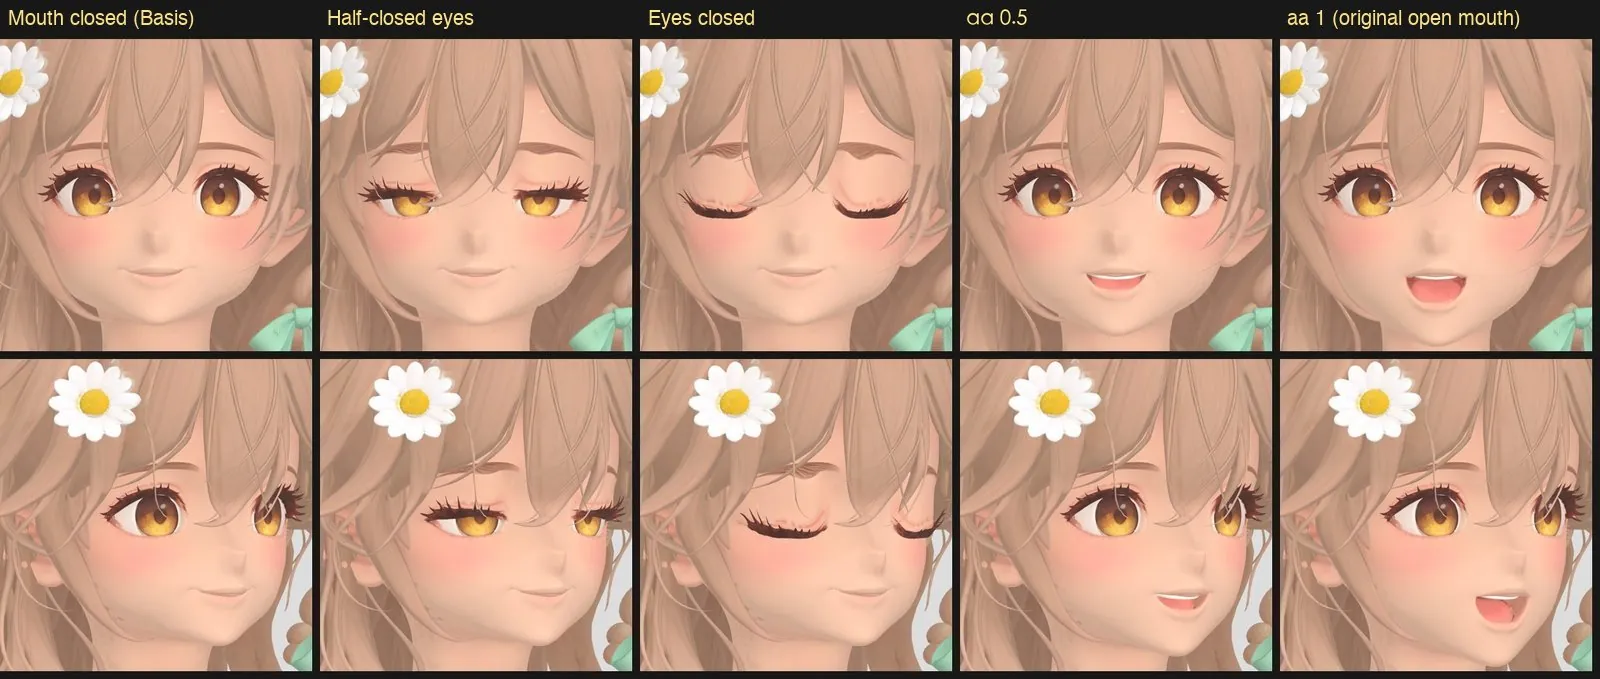
- Work backward from the open-mouth, open-eye model to close the mouth and eyes, storing the deformations as shape keys (recorded vertex displacements)
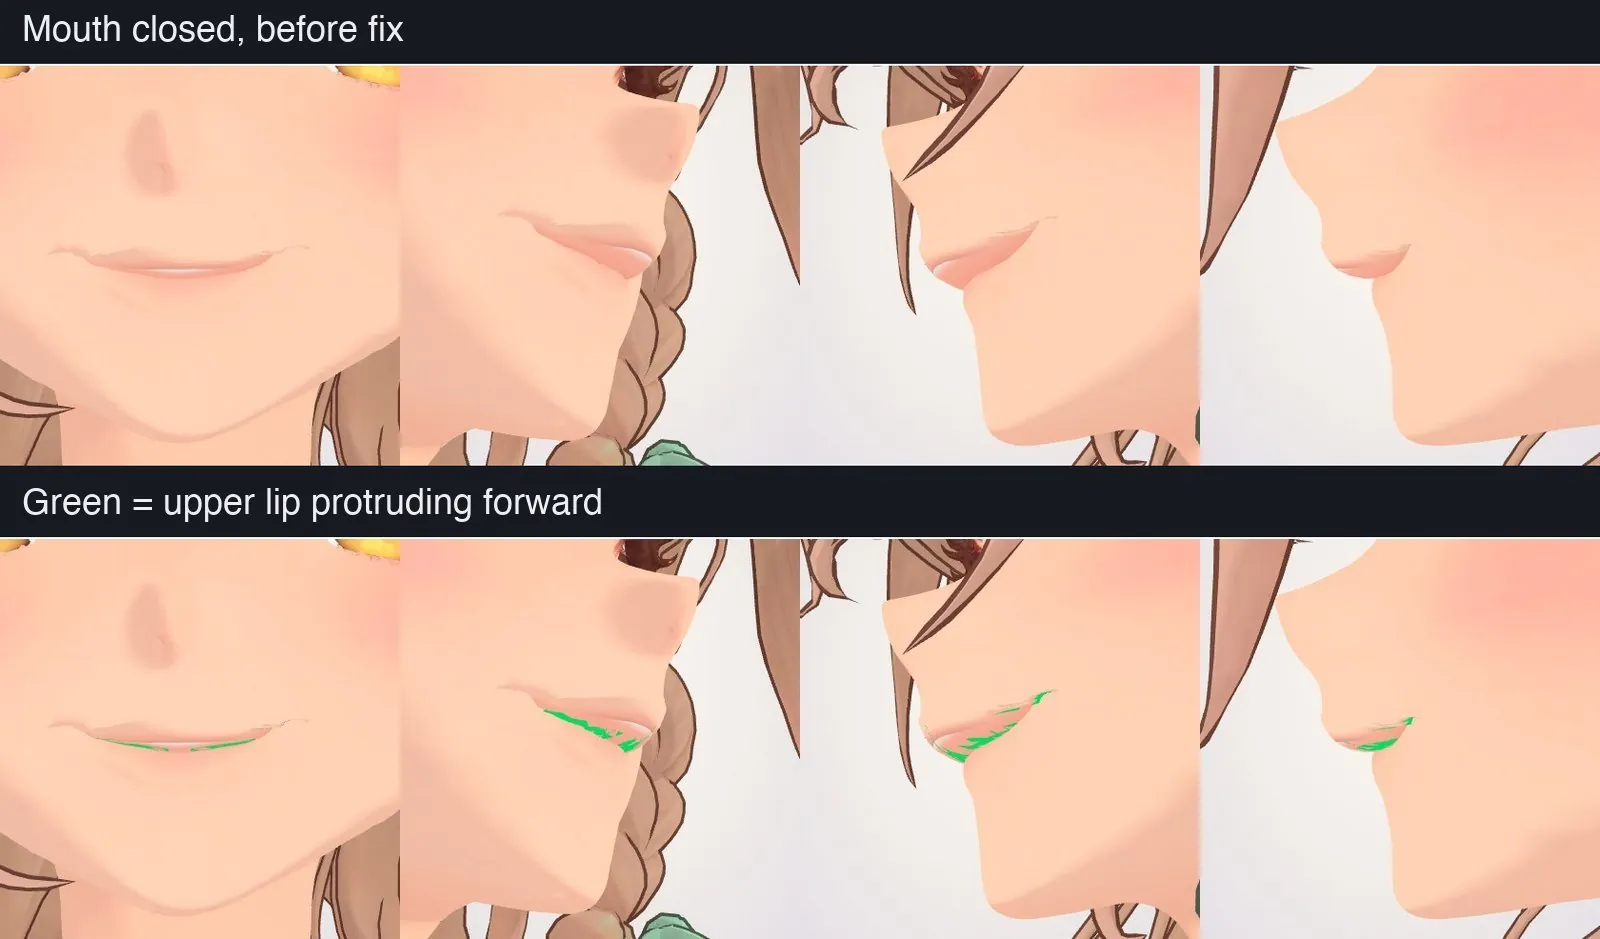
- Generate another reference head with closed eyes and mouth (100 credits); after alignment, use the depth of its eyelids and lips and taper the effect into the surrounding area
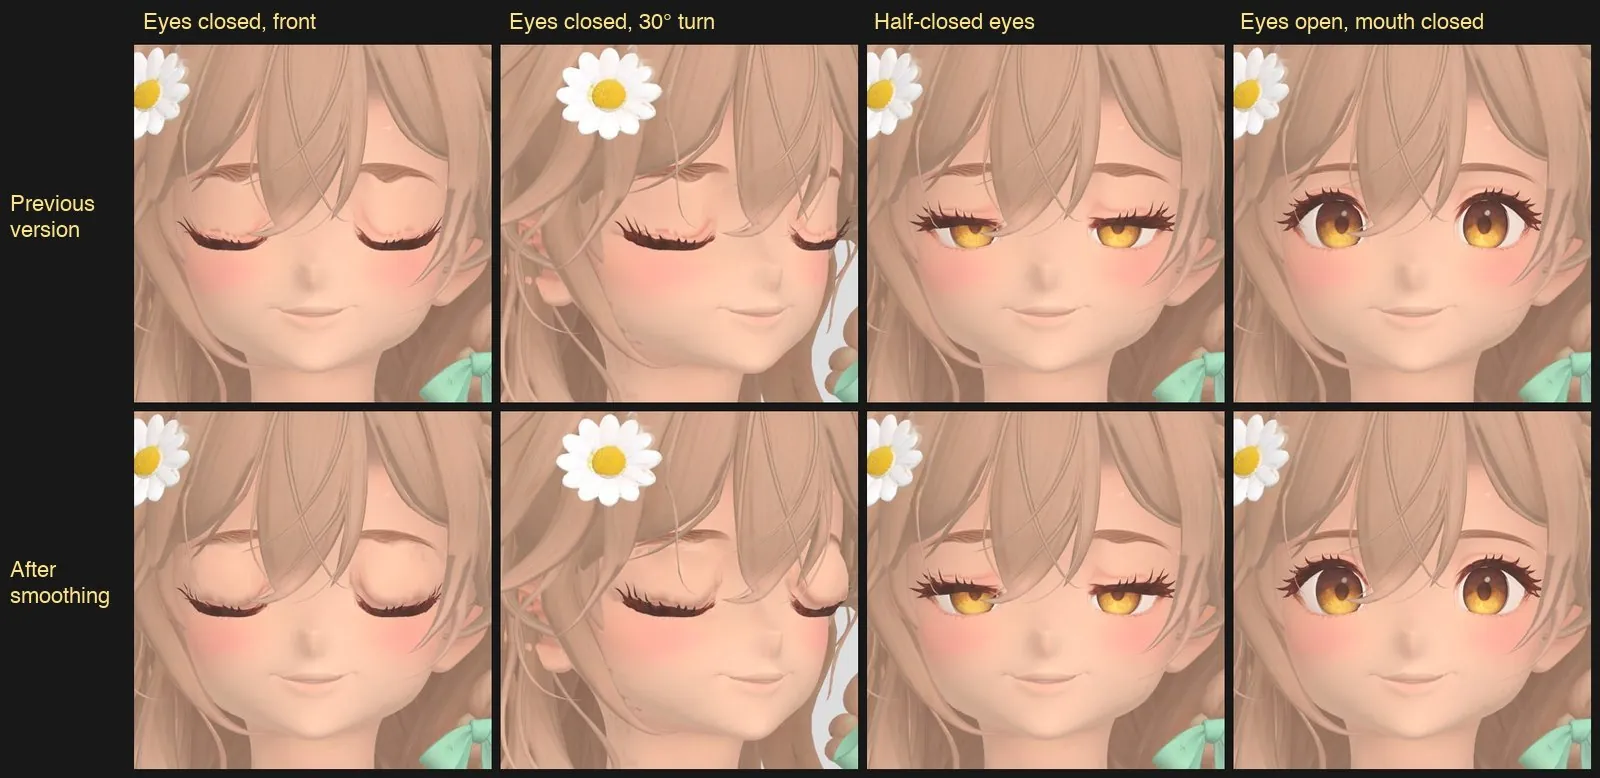
- Solve a harmonic field for eyelid movement, holding the stiff part of the eyelid, the lower lid, and the outer boundary fixed
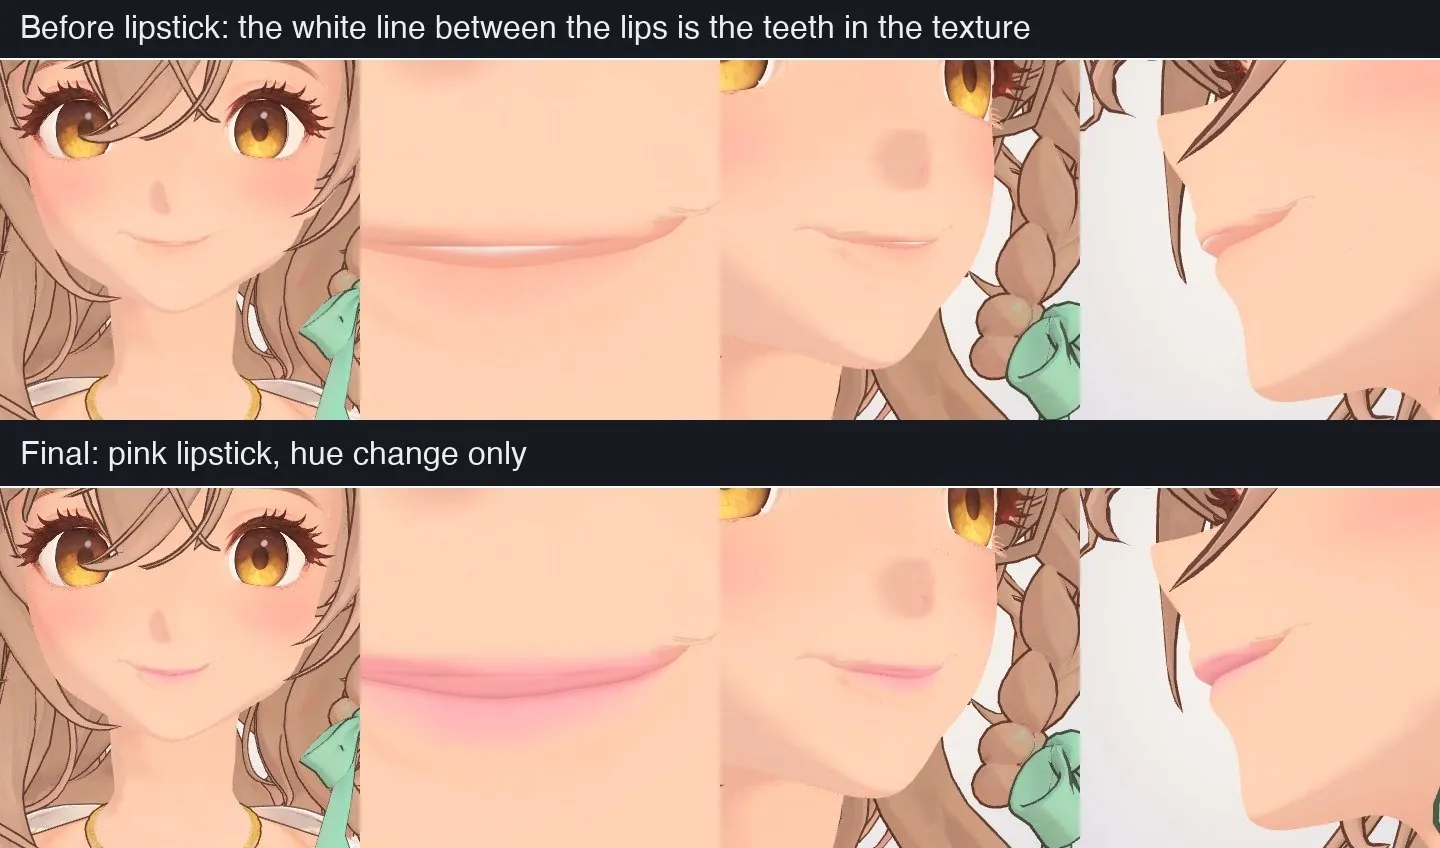
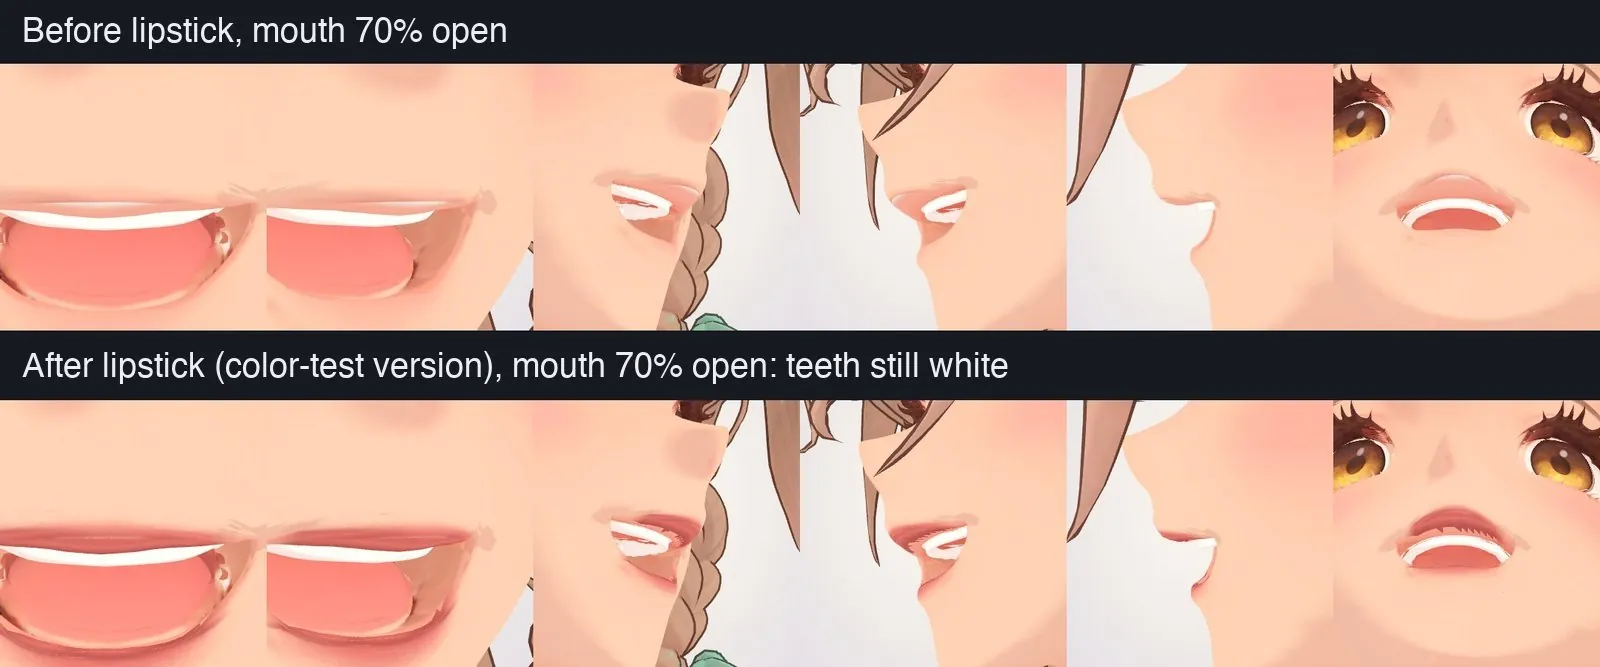
- Cover the tooth texture between the lips with lipstick: bake it into the face texture along the groove between the lips, first covering pixels lighter than the lip color within 2.2 mm above the lip line
- Change only the lipstick hue, keeping the original light and shadow of the lips

Acceptance
- Closed mouth: visible pixels inside the mouth from five angles are 0 (control: 10,854 px from the front when fully open)
- Open mouth: at 25%, 50%, 75%, and 100%, neither the teeth nor the tongue pass through the lips
- Closed eyes: count exposed eyeball slits from the front and 30° left and right (final version: 0 on the right eye, 1–3 on the left)
- Check every expression from the side once
Why
- The eyeballs on this head sit 6 mm deeper than the surrounding skin. Sliding the eyelids down at their original depth made U-shaped dents in the eye sockets; smoothing them made the lids look swollen
- Closing the upper lip directly made it protrude 6.4 mm, which was invisible from the front. Using the reference head reduced it to 3.8 mm; the reference head itself measured 4.0 mm
- Tripo painted the upper teeth into the open-mouth texture. After closing the mouth, they landed right on the lower edge of the upper lip, appearing as a white line from the front. Baking on lipstick reduced the white pixels on the lip line from 577 to 0
Outfits and expressions
Method
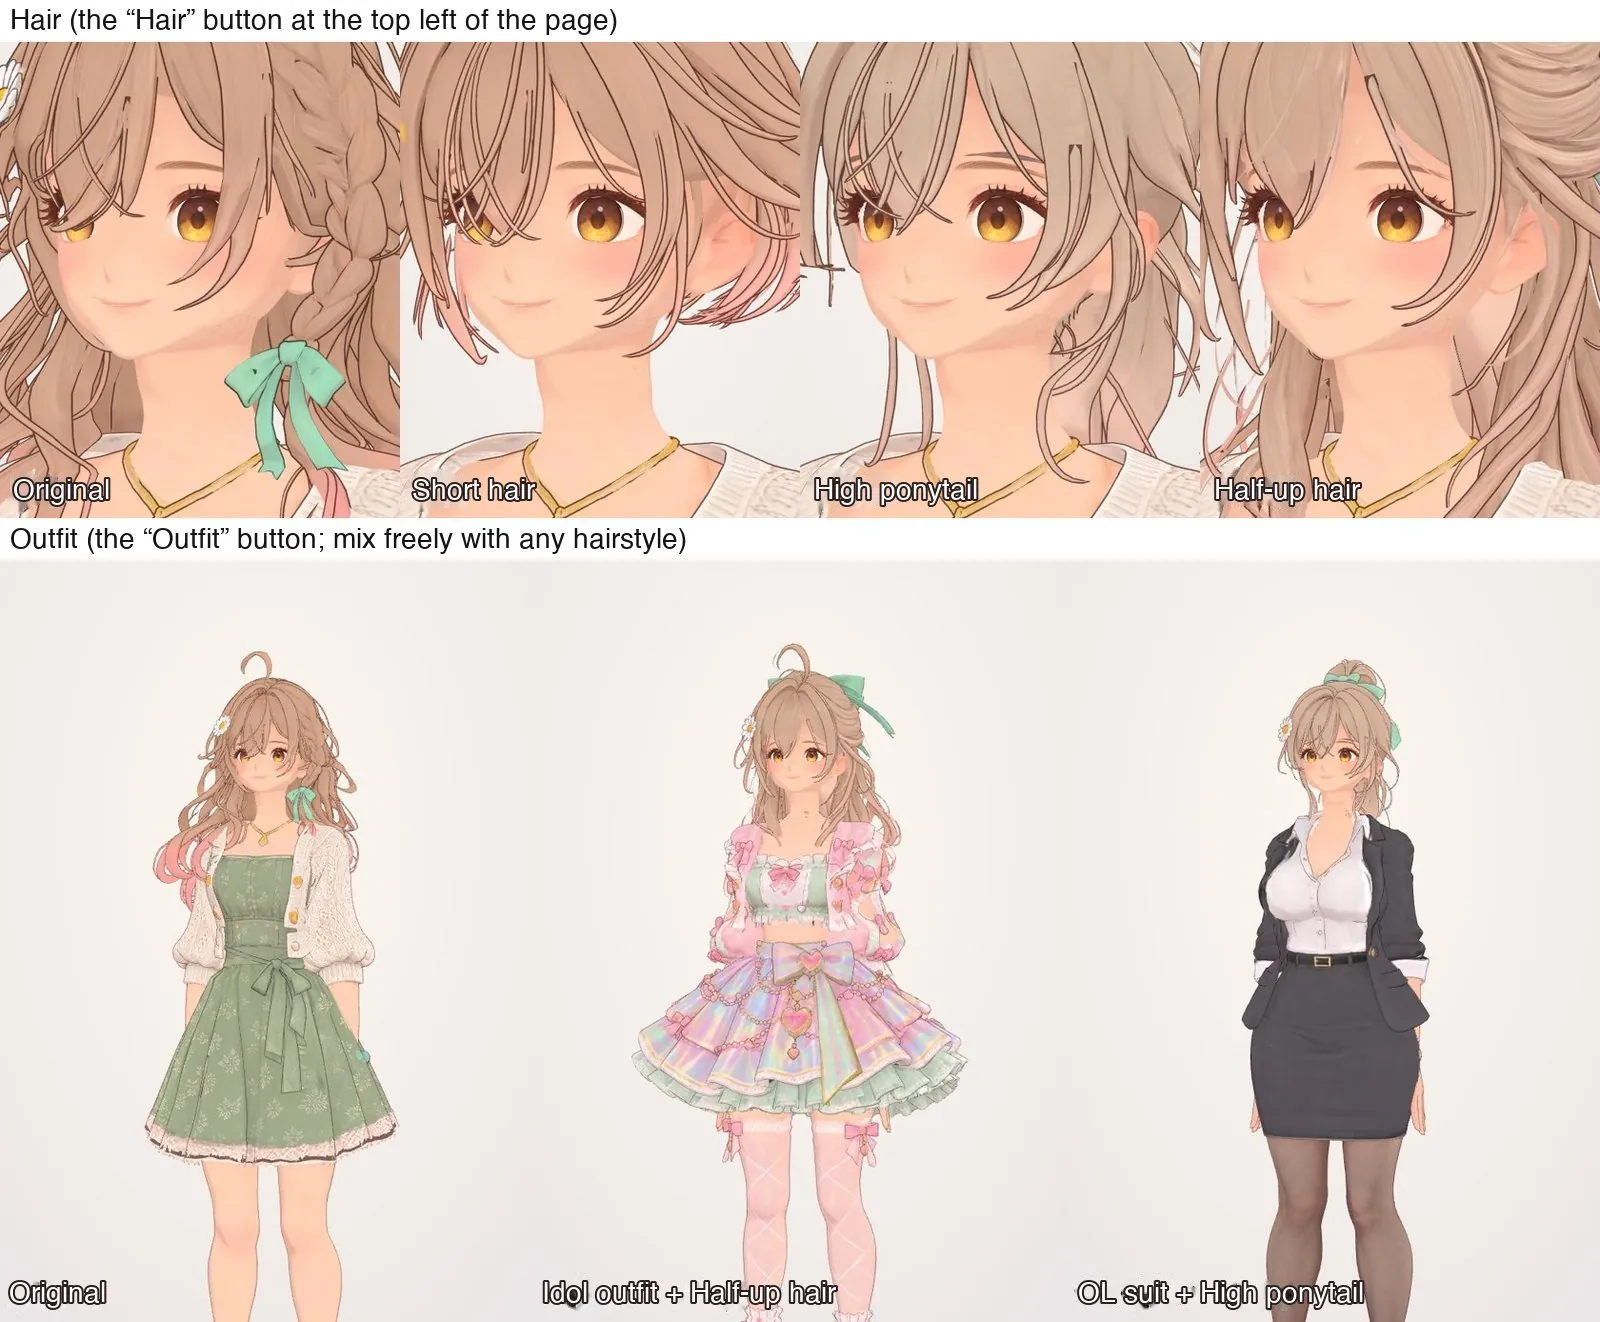
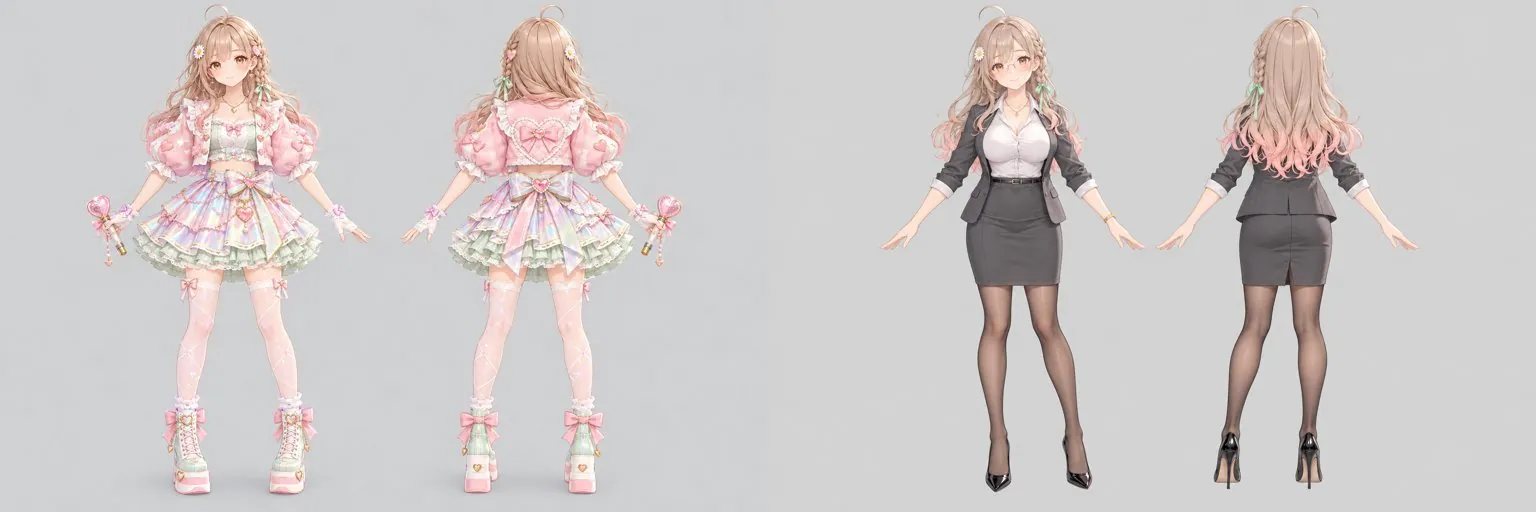
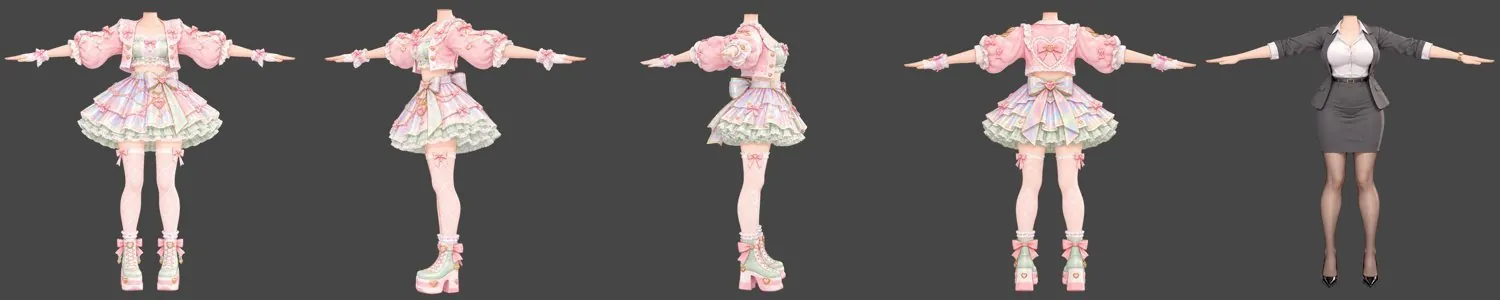
- Clothes: ask ChatGPT to edit the four views with new clothes → use Tripo to generate a headless body in a T-pose → align it to Hina with ICP, excluding the 30% largest errors on each pass → copy weights from the nearest point on Hina's body to each vertex, excluding the skirt and keeping the four most influential bones → join the neck cut to the head
- Hairstyles: use Tripo to generate a “head plus hair,” overlay Hina's head on that head to calculate the alignment, move the hair with it, and bind it to the head bone
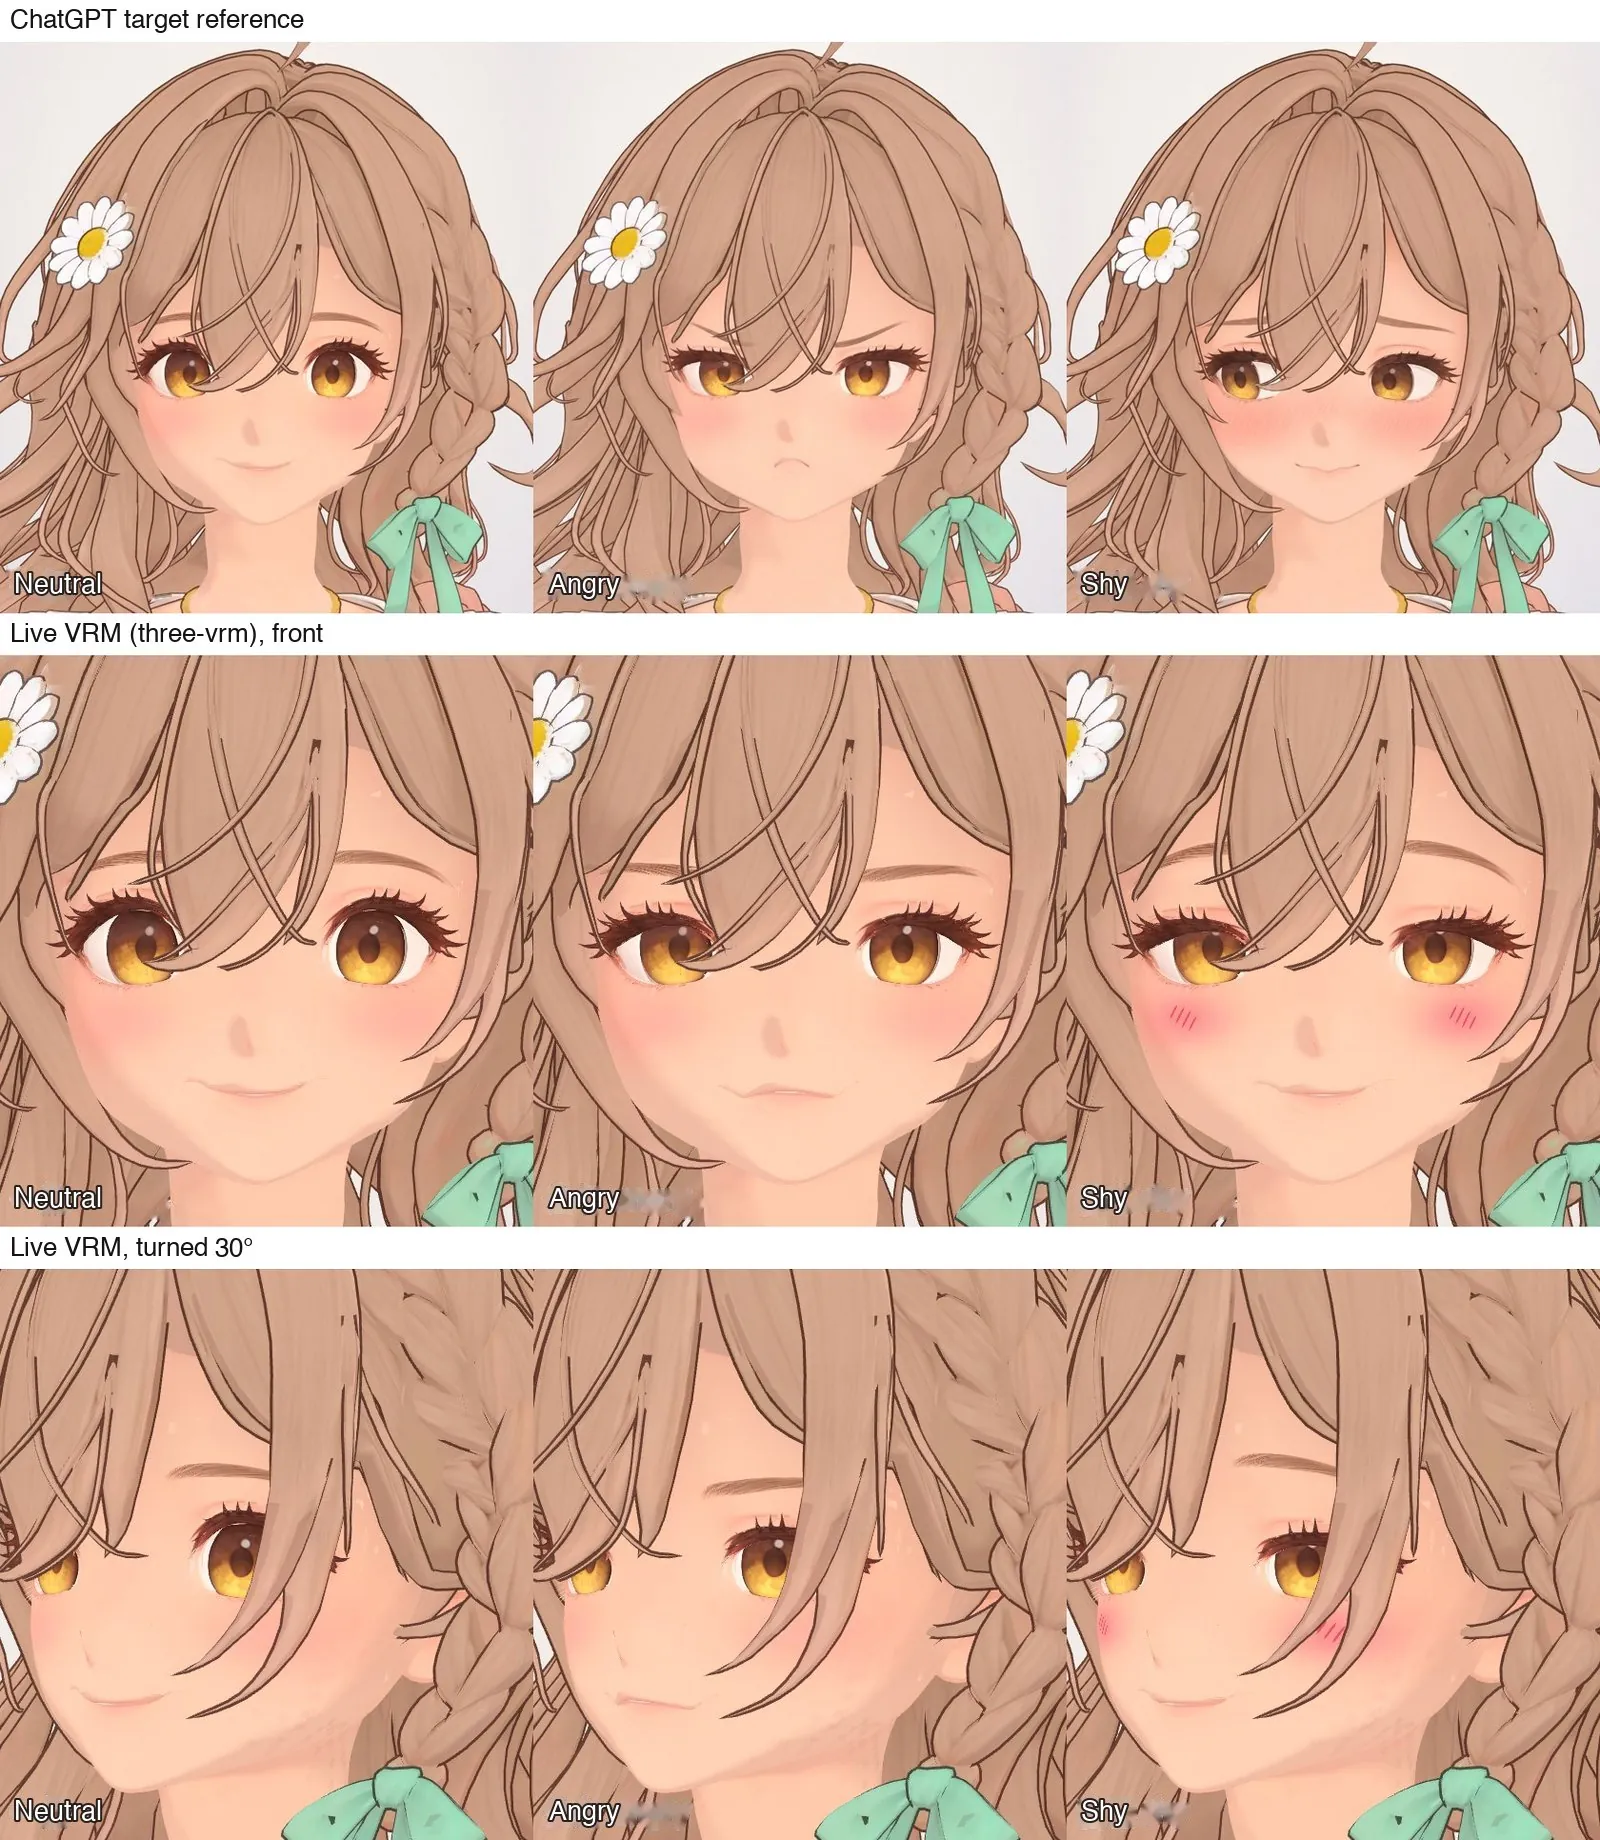
- Angry and shy: cut the eyebrows out of the texture as separate patches, fill their original positions with skin color, and add blush for the shy expression
Acceptance
I tried on every outfit on the web page and switched to every expression there once.
Why
- Once one body is rigged, clothes can copy its weights; adding outfits does not require rigging again
- When eyebrows were painted on the skin, a 2–4 mm skin movement flipped 22–47 triangles near the brow tails
- I finished the purple curls but did not use them: the hair was too sparse and looked like a bald patch
There are currently three hairstyles—high ponytail, half-up hair, and short hair—and two outfits, the idol outfit and OL suit.
Voice and lip sync
Method
- I used ElevenLabs Voice Design to describe a voice in text and generate Hina's voice; Eleven v4 spoke the Chinese, Japanese, English, and Korean lines (free plan)
- wav2vec2 (XLSR-53, the version that outputs International Phonetic Alphabet symbols) recognizes one sound every 20 ms
- Map the phonemes to five mouth shapes: a, i, u, e, o. For glides starting with i or u (as in “月” and “亮”), use the following vowel's mouth shape; briefly close the mouth for b, p, m, f, and v
- Use volume to set mouth opening in three levels—closed, half open, fully open—at 30 frames per second
- The model has only one open-mouth shape. On the web page, derive i, e, o, and u from it: reduce the opening, pull the mouth corners outward for i and e, and pull them inward and purse them forward for o and u
- Use the word-level timings returned by ElevenLabs for subtitles, with one corrected offset per language
Acceptance
Subtitles must line up with the audio. Compare the “this word is being spoken” and “audio is loud enough” timelines at different offsets and choose the one with the most overlap. This time, Chinese needed to start 0.24 seconds earlier, Korean 0.15 seconds, Japanese 0.12 seconds, and English 0.04 seconds.
Why
Lip sync uses only the audio, so all four languages share the same code. The timings returned by ElevenLabs lag behind the actual audio, with a different lag for each language.
Put it on the web
Method
Export a VRM and render it live on the web page with three.js and three-vrm. I converted the Mixamo motions to Hina's skeleton locally first. The finished version is at the end of this article, ready to try.
I also added three layers of protection to the public version:
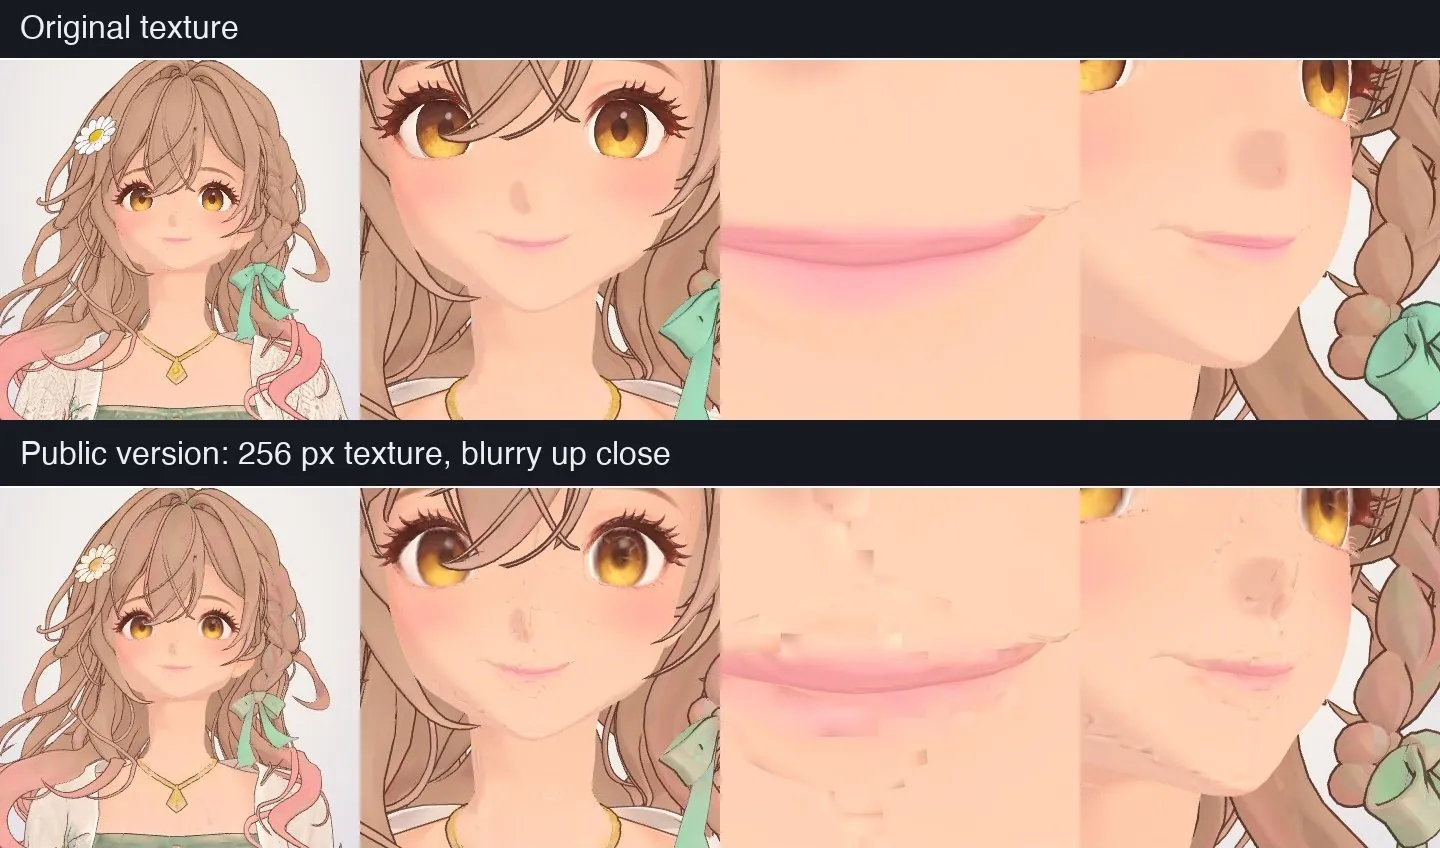
- Reduce textures to 256 px, keeping the originals on my own computer
- Encrypt the model and motion data in transit
- Hide an invisible watermark in the textures
Any model that can be rotated on a web page ultimately reaches the reader's computer. These three layers only raise the barrier.
Acceptance
I checked the licenses one by one.
- Mixamo: commercial use is allowed, but distribution of the original motion files is not. The public version contains only converted motions; this is my interpretation of the terms based on how games use them, and I did not confirm it with Adobe
- Bandai Namco motion dataset: CC BY-NC-ND. Applying it to another character counts as an adaptation, so I left it out of the public version
- ElevenLabs free plan: credit elevenlabs.io and do not monetize
How much I spent
The only recorded cash expense was one month of Tripo Pro: CN¥140 per month, 30% off the first month, so I paid CN¥98. I paid on 2026-09-29, for the billing period 9/29–10/29. Exporting P2.0 models requires Pro.

Credits (only the recorded portion; outfit generation was not logged):
| Purpose | Credits |
|---|---|
| Head, body, and hair meshes | 300 |
| Body and hair textures (head used an 8K trial, 0 credits) | 40 |
| Auto Rig | 20 |
| Closed-eye, closed-mouth reference head | 100 |
| First round with left and right reversed, discarded | 360 |
Other tools: the ElevenLabs free plan and Mixamo were free; Blender and three.js are open-source software. ChatGPT and Opus 5.5 subscription fees are not included in the cash amount above.
Opus 5.5 wrote and revised the code over this week in a total of 93 commits.
What remains unfinished
Known issues at the moment:
- When the eyes close, there is a thin sliver at the outer corner, the eyelash band is too thick, and a few spikes remain; from the side, 1–3 eyeball slits are still visible on the left eye
- A faint crease remains under the chin when she looks down and turns her head
- At the right corner of the mouth, 2 small faces bend by more than 60°
- Fine grain is visible below the lower lip up close
- In a T-pose, the arms pass through the hair (the public version defaults to lowered arms)
- I have not tested performance on a phone. The public page reports about 270,000 triangles, and the outline draws the model a second time
Next I want to make Hina a full dress-up doll. I have not tried any of these three areas yet:
- Dress-up system
- Eye color: the eyeballs are separate meshes, so I plan to change only the color in that part of the texture
- Expressions: add the standard VRM happy, sad, surprised, and relaxed expressions
- Clothes and motions: keep adding more
- Body and face sliders
- Height, leg length, and head and face size: I plan to scale bones. I expect nonuniform scaling to deform the face and hands
- Bust, waist, hips, and face width: I plan to make these shape keys controlled by sliders
- Clothes: each outfit needs a matching set of shape keys so it changes when the body gets wider. I expect this to be the largest amount of work: every new body slider adds another set for every outfit
- Webcam motion capture: I plan to detect facial and body landmarks in the browser, convert them into bone angles and expression weights, and apply them to Hina in real time. The video would be processed only on the reader's computer and would not be uploaded
Try it
Drag to rotate the view. Use the buttons to change hairstyles, outfits, and expressions; the menu at the top right has 38 motions. To reduce the risk of direct model downloads, the web version uses 256 px textures, so it looks a little blurry up close. That is expected.
Copyright notice
- 陽菜 Hina character design, 3D model, textures, expressions, and outfits © 2026 JonesHong. For viewing on this page only; downloading, reposting, redistribution, and adaptations are prohibited
- 3D mesh and textures: generated with Tripo AI (tripo3d.ai)
- Design sheet and four views: generated with ChatGPT (OpenAI)
- Voice: generated with ElevenLabs (elevenlabs.io)
- Motions: Mixamo (© Adobe). The page contains only converted motion data, not the original files
- Web rendering: three.js (MIT, © three.js authors), @pixiv/three-vrm and @pixiv/three-vrm-animation (MIT, © pixiv Inc.)
- 3D editing: Blender (GNU GPL, Blender Foundation)
- Lip sync: wav2vec2 XLSR-53 phoneme recognition model (Apache-2.0, Meta)
Use the ten steps to check your own character file
Generating parts separately, fixing the seam layer by layer, checking expressions from the side, and checking licenses before publishing are the four easiest things to miss.
Paste the following into your AI assistant and have it check your 3D character.
Further reading
| Resource | Why it matters |
|---|---|
| Nano (@Dstudio_ai)'s production notes | The head and body each had 20,000 polygons, more than half the time went into weight painting, and the face texture needed manual fixes. That is why we set each part to 25,000 polygons. |
| Long article by お寿司職人 (@SushiNFTart) | The hair, head, and body were generated separately, and the mouth was built backward from an open-mouth model. The order of this workflow came from that article. |
| The three-vrm humanoidAnimation example | How to transfer Mixamo motions to a VRM skeleton. The preconversion in step 10 uses its conversion code. |